1st, Motivation and First Steps

It’s incredible how far an engineer will go to solve a simple problem, but maybe it’s not about the problem itself, or the solution, but just the fun of doing something new and challenging…

In this case, the motivation came from a simple, everyday situation: My cable TV provider’s cheap set-top box remote was getting worse and worse, no matter how many times I opened it to clean it, always go back to sticky buttons, keys that didn’t they respond etc. What a great opportunity to get started on deep neural networks and computer vision 🙂 , let’s make a TV control based on hand gestures!

After I started doing some research, my first disappointment was to find that there were many examples going around and they all were based on the same structure, many convolutional networks stacked together in order to recognize a human hand. This is a good approach in many scenarios, but represents some particular challenges for this project, one is that, in order to be reliable, they require a huge amount of training data, hundreds (if not thousands) of hand images, shooted at slightly different angles, in different lighting conditions, different hands, etc. The second issue is very similar, the system should recognize different hand gestures, that means again lots of training images, this is both impractical and at the same time, lacking the necessary flexibility for this to be easily expandable. I have read of a few projects that went down this route, some with a notable level of success, but I suspected at that time that there must be something better out there.

It was around a week later when I found out about this project from google called MediaPipe, as they define it:

Basically is a graph based set of modules to process serial data in a pipelined structure. But what definitely caught my attention was this entry on google’s AI blog:

https://ai.googleblog.com/2019/08/on-device-real-time-hand-tracking-with.html

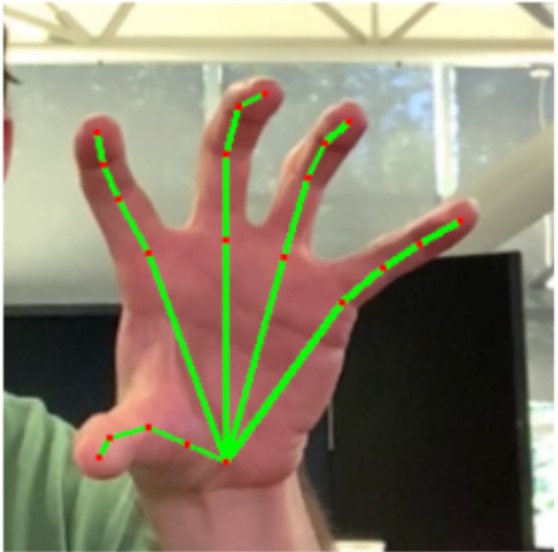
In short,they are inferring a set of hand landmarks that corresponds to the wrist, palm and finger joints, from there they establish a set of “connections“ representing the relations between each joint:

But the best part of this approach is that, as you can read further in the article, this concept enables the recognition of gestures by measuring the angle of the relevant joints, and this is VERY important because it enables to infer gestures based on its Invariant Features, meaning that we now dont have to rely on a “dumb” recognizer that only matches patterns of an image like a standard convolutional network does, but a more human like level of inteligence, establishing relations between features.

There are other worth mentioning aspects of their implementation: 

  •  – C++ based, designed from the ground up to be as fast as possible.  
  • – Relatively easy to port to major platforms:, Linux, Android, IOS, Windows?
  • – Support for CPU, GPU and Coral inference 
  • – They also developed a very nice trick to drastically improve performance, instead of    scanning the whole image in search for a hand, they trained a palm NN model which requires less time to recognize a hand presence, and from there they set a bounding box (a portion of the entire frame) in which the landmarks are then inferred.

Now that the underlying technology is established, it was time to set up the development environment. My main laptop runs on Windows, the current Mediapipe environment is meant to be installed on Linux  and I was not willing to fiddle with second partitions and whatever, some form of emulation is in order.

At first I tried the new, and very exciting, WSL 2 (windows subsystem for linux), it has a lot of potential for linux app development windows  but the main issue for me at that time was not being able to use a webcam as a video source. I tried many different approaches, including a webcam emulator called  v4l2loopback, but as often is the case with linux, things can turn out to be pretty troublesome.

The second approach was to use the docker image for Mediapipe on Docker for Windows, but then again, getting video from the windows webcam to the linux system proved to be very time consuming.

Finally, the right (or at least acceptable) combination was to run a VMware Ubuntu virtual machine, and stream the webcam’s video with ffmpeg, here’s my .bat for that, I’m not using my laptop’s webcam but an indestructible Logitech C270,mainly because it’s important to be a able to put the camera very close by to the controlled device, in this case on top or at the bottom of my TV.

This is the ffmpeg command that will stream the webcam to the Ubuntu’s vmware machine:

ffmpeg -f dshow ^

-i video="Logitech HD Webcam C270" ^

-profile:v high -pix_fmt yuv420p -level:v 4.1 -preset ultrafast -tune zerolatency ^

 	-vcodec libx264 -r 15 -b:v 512k -s 1024x768 -bufsize:v 50M  ^

-f rtp_mpegts -flush_packets 0 rtp://192.168.1.60:5000 

Note that the IP in the last line corresponds to the VM ip address and port. Ffplay is the simplest way to test that video is effectively being streamed into the VM, just run the bat on windows and run the following in a console inside the VM:

ffplay rtp://0.0.0.0:5000 

To install Mediapipe on the VM, just follow the instructions on the oficial documentation:

Now that everything is in place, is time for a quick test, just getting video into a MediaPipe graph and displaying it into a window… the first issue, MediaPipe at that time didn’t provide a calculator (that’s their denomination for a node) to display video in Linux, only android and ios. This was a great opportunity to make my first calculator, it was easier than expected since I just toked the structure of an existing one and tailored so it can output video to a OpenCV’s imshow window:

// Copyright 2020 Lisandro Bravo.
//
// Licensed under the Apache License, Version 2.0 (the "License");
// you may not use this file except in compliance with the License.
// You may obtain a copy of the License at
//
//      http://www.apache.org/licenses/LICENSE-2.0
//
// Unless required by applicable law or agreed to in writing, software
// distributed under the License is distributed on an "AS IS" BASIS,
// WITHOUT WARRANTIES OR CONDITIONS OF ANY KIND, either express or implied.
// See the License for the specific language governing permissions and
// limitations under the License.

#include <memory>
#include <string>
#include <vector>

#include "absl/strings/str_split.h"
#include "mediapipe/calculators/video/opencv_video_encoder_calculator.pb.h"
#include "mediapipe/framework/calculator_framework.h"
#include "mediapipe/framework/formats/image_frame.h"
#include "mediapipe/framework/formats/image_frame_opencv.h"
#include "mediapipe/framework/formats/video_stream_header.h"
#include "mediapipe/framework/port/file_helpers.h"
#include "mediapipe/framework/port/opencv_highgui_inc.h"
#include "mediapipe/framework/port/opencv_imgproc_inc.h"
#include "mediapipe/framework/port/opencv_video_inc.h"
#include "mediapipe/framework/port/ret_check.h"
#include "mediapipe/framework/port/source_location.h"
#include "mediapipe/framework/port/status.h"
#include "mediapipe/framework/port/status_builder.h"
#include "mediapipe/framework/tool/status_util.h"

namespace mediapipe {

// Encodes the input video stream and produces a media file.
// The media file can be output to the output_file_path specified as a side
// packet. Currently, the calculator only supports one video stream (in
// mediapipe::ImageFrame).
//
// Example config to generate the output video file:
//
// node {
//   calculator: "OpenCvVideoImShowCalculator"
//   input_stream: "VIDEO:video"
//   input_stream: "VIDEO_PRESTREAM:video_header"
//   input_side_packet: "OUTPUT_FILE_PATH:output_file_path"
//   node_options {
//     [type.googleapis.com/mediapipe.OpenCvVideoImShowCalculatorOptions]: {
//        codec: "avc1"
//        video_format: "mp4"
//     }
//   }
// }
class OpenCvVideoImShowCalculator : public CalculatorBase {
 public:
  static ::mediapipe::Status GetContract(CalculatorContract* cc);
  ::mediapipe::Status Open(CalculatorContext* cc) override;
  ::mediapipe::Status Process(CalculatorContext* cc) override;
  ::mediapipe::Status Close(CalculatorContext* cc) override;

 private:
  ::mediapipe::Status SetUpVideoWriter();

  std::string output_file_path_;
  int four_cc_;

  std::unique_ptr<cv::VideoWriter> writer_;
};

::mediapipe::Status OpenCvVideoImShowCalculator::GetContract(
    CalculatorContract* cc) {
  RET_CHECK(cc->Inputs().HasTag("VIDEO"));
  cc->Inputs().Tag("VIDEO").Set<ImageFrame>();
  if (cc->Inputs().HasTag("VIDEO_PRESTREAM")) {
    cc->Inputs().Tag("VIDEO_PRESTREAM").Set<VideoHeader>();
  }
  //RET_CHECK(cc->InputSidePackets().HasTag("OUTPUT_FILE_PATH"));
  //cc->InputSidePackets().Tag("OUTPUT_FILE_PATH").Set<std::string>();
  return ::mediapipe::OkStatus();
}

::mediapipe::Status OpenCvVideoImShowCalculator::Open(CalculatorContext* cc) {
  OpenCvVideoEncoderCalculatorOptions options =
      cc->Options<OpenCvVideoEncoderCalculatorOptions>();
  RET_CHECK(options.has_codec() && options.codec().length() == 4)
      << "A 4-character codec code must be specified in "
         "OpenCvVideoEncoderCalculatorOptions";
  const char* codec_array = options.codec().c_str();
  four_cc_ = mediapipe::fourcc(codec_array[0], codec_array[1], codec_array[2],
                               codec_array[3]);
  RET_CHECK(!options.video_format().empty())
      << "Video format must be specified in "
         "OpenCvVideoEncoderCalculatorOptions";
 /* output_file_path_ =
      cc->InputSidePackets().Tag("OUTPUT_FILE_PATH").Get<std::string>();
  std::vector<std::string> splited_file_path =
      absl::StrSplit(output_file_path_, '.');
  RET_CHECK(splited_file_path.size() >= 2 &&
            splited_file_path[splited_file_path.size() - 1] ==
                options.video_format())
      << "The output file path is invalid.";*/
  // If the video header will be available, the video metadata will be fetched
  // from the video header directly. The calculator will receive the video
  // header packet at timestamp prestream.
  if (cc->Inputs().HasTag("VIDEO_PRESTREAM")) {
    return ::mediapipe::OkStatus();
  }
  return SetUpVideoWriter();
}

::mediapipe::Status OpenCvVideoImShowCalculator::Process(
    CalculatorContext* cc) {
  if (cc->InputTimestamp() == Timestamp::PreStream()) {
    //const VideoHeader& video_header =
    //    cc->Inputs().Tag("VIDEO_PRESTREAM").Get<VideoHeader>();
    return SetUpVideoWriter();
  }

  const ImageFrame& image_frame =
      cc->Inputs().Tag("VIDEO").Value().Get<ImageFrame>();
  ImageFormat::Format format = image_frame.Format();
  cv::Mat frame;
  if (format == ImageFormat::GRAY8) {
    frame = formats::MatView(&image_frame);
    if (frame.empty()) {
      return ::mediapipe::InvalidArgumentErrorBuilder(MEDIAPIPE_LOC)
             << "Receive empty frame at timestamp "
             << cc->Inputs().Tag("VIDEO").Value().Timestamp()
             << " in OpenCvVideoImShowCalculator::Process()";
    }
  } else {
    cv::Mat tmp_frame = formats::MatView(&image_frame);
    if (tmp_frame.empty()) {
      return ::mediapipe::InvalidArgumentErrorBuilder(MEDIAPIPE_LOC)
             << "Receive empty frame at timestamp "
             << cc->Inputs().Tag("VIDEO").Value().Timestamp()
             << " in OpenCvVideoImShowCalculator::Process()";
    }
    if (format == ImageFormat::SRGB) {
      cv::cvtColor(tmp_frame, frame, cv::COLOR_RGB2BGR);
    } else if (format == ImageFormat::SRGBA) {
      cv::cvtColor(tmp_frame, frame, cv::COLOR_RGBA2BGR);
    } else {
      return ::mediapipe::InvalidArgumentErrorBuilder(MEDIAPIPE_LOC)
             << "Unsupported image format: " << format;
    }
  }
  cv::imshow("MediaPipe",frame);
  cv::waitKey(25);
  
  return ::mediapipe::OkStatus();
}

::mediapipe::Status OpenCvVideoImShowCalculator::Close(CalculatorContext* cc) {
  //cv::destroyAllWindows();
  return ::mediapipe::OkStatus();
}

::mediapipe::Status OpenCvVideoImShowCalculator::SetUpVideoWriter() {

  cv::namedWindow("MediaPipe",cv::WINDOW_GUI_EXPANDED);
  return ::mediapipe::OkStatus();
}

REGISTER_CALCULATOR(OpenCvVideoImShowCalculator);
}  // namespace mediapipe
 

I won’t go into the details of a calculator structure since everything is covered in deep in the official documentation: https://mediapipe.readthedocs.io/en/latest/calculator.html

Now is time to actually test a video in/out pipeline, starting by the simplest graph ever:

# MediaPipe graph, simple input and output video 

# on CPU.

# Used in the example in

# mediapipie/examples/desktop/object_detection:object_detection_tensorflow.

# Decodes an input video file into images and a video header.

node {

  calculator: "OpenCvVideoDecoderCalculator"

  input_side_packet: "INPUT_FILE_PATH:input_video_path"

  output_stream: "VIDEO:input_video"

  output_stream: "VIDEO_PRESTREAM:input_video_header"

}

# Encodes the annotated images into a video file, adopting properties specified

# in the input video header, e.g., video framerate.

node {

  calculator: "OpenCvVideoImShowCalculator"

  input_stream: "VIDEO:input_video"

  input_stream: "VIDEO_PRESTREAM:input_video_header"

  node_options: {

    [type.googleapis.com/mediapipe.OpenCvVideoEncoderCalculatorOptions]: {

      codec: "avc1"

      video_format: "mp4"

    }

  }

} 

By the way, the MediaPipe team provides an amazing online visualization tool for graphs:

Here is the visual representation of the previous graph:

Now in order to make an executable, MediaPipe relies on Bazel, a very powerful and somehow easier to read/understand replacement for Make: https://en.wikipedia.org/wiki/Bazel_(software)

Its very easy to get started, just read the BUILD file on each relevant folder. In this case, as a brief example you can see how this compiles the main Graph Runner and the Graph dependant calculators:

package(default_visibility = ["//mediapipe/examples:__subpackages__"])

cc_binary(

    name = "simple_io_tflite",

    deps = [

        "//mediapipe/examples/desktop:simple_run_graph_main",

        "//mediapipe/graphs/simple_io:desktop_tflite_calculators",

    ],

) 

Last thing is to compile and run this simple video test, compiling is as simple as:

$ bazel build -c opt --define MEDIAPIPE_DISABLE_GPU=1 \
    mediapipe/examples/desktop/simpleIO:simple_io_tflite 

Running (notice the graph argument and the video source):

$ bazel-bin/mediapipe/examples/desktop/simpleIO/simple_io_tflite \
    --calculator_graph_config_file=mediapipe/graphs/simple_io/simple_media_to_screen_graph.pbtxt \
    --input_side_packets=input_video_path=rtp://0.0.0.0:5000 

Also, in that folder there is a readme file detailing how to compile as well as some other examples on how to get video in/out from/to different sources

Lastly, this tiny graph project is located in the MediaPipe folder, because I would like for the MediaPipe team to include a basic starting example in future releases so others can benefit from it.

That’s it for now, but first a small “disclaimer”: I know there must be a gazillion different approaches to this whole project and/or parts of it, I’m sure that many of them are much nicer and cleaner than what I did. My main goal with this first beta is to get a working and stable prototype out there with a solid underlying structure. There will be tons of time in the future to iron small details and I’m really eager to hear what you would have done differently.