2nd, Static Gestures, Gathering Data

With the development environment up and running, next in the pipeline is to be able to detect and interpret static gestures, the basis of this framework.

The MediaPipe team have shown the framework recognizing gestures in the document:

https://ai.googleblog.com/2019/08/on-device-real-time-hand-tracking-with.html

Now unfortunately they didn’t share the code on how to do it, but there are some clues on how. Since every landwark(finger and palm joints) is detected and the tags for each joint is constant, we can use the relation between joints to estimate an angle for each phalange. I use the word “estimate” correctly because we are going to be estimating a 3d angle from a 2d Image.

First in order is to identify each landmark. To make everything more visual and easy to understand, I begun by modifying the calculator that render landmarks: 

mediapipe/calculators/util/landmarks_to_render_data_calculator.cc

In this calculator this code enables to tag each landmark in the video output:

      const unsigned char lmIndex = &landmark - &landmarks[0];

      auto* landmarks_text_render = render_data->add_render_annotations();

      auto* landmark_text =

      landmarks_text_render->mutable_text();

      std::string dispText = "LM:";

      dispText.append(std::to_string(lmIndex));

      landmark_text->set_normalized(true);

      landmark_text->set_display_text(dispText); 

      landmark_text->set_font_height(0.03);

      landmark_text->set_baseline(landmark.y());

      landmark_text->set_left(landmark.x() + 0.02);

      landmarks_text_render->mutable_color()->set_r(0);

      landmarks_text_render->mutable_color()->set_g(0);

      landmarks_text_render->mutable_color()-> set_b(255);

      landmarks_text_render->set_scene_tag(kLandmarkLabel); 

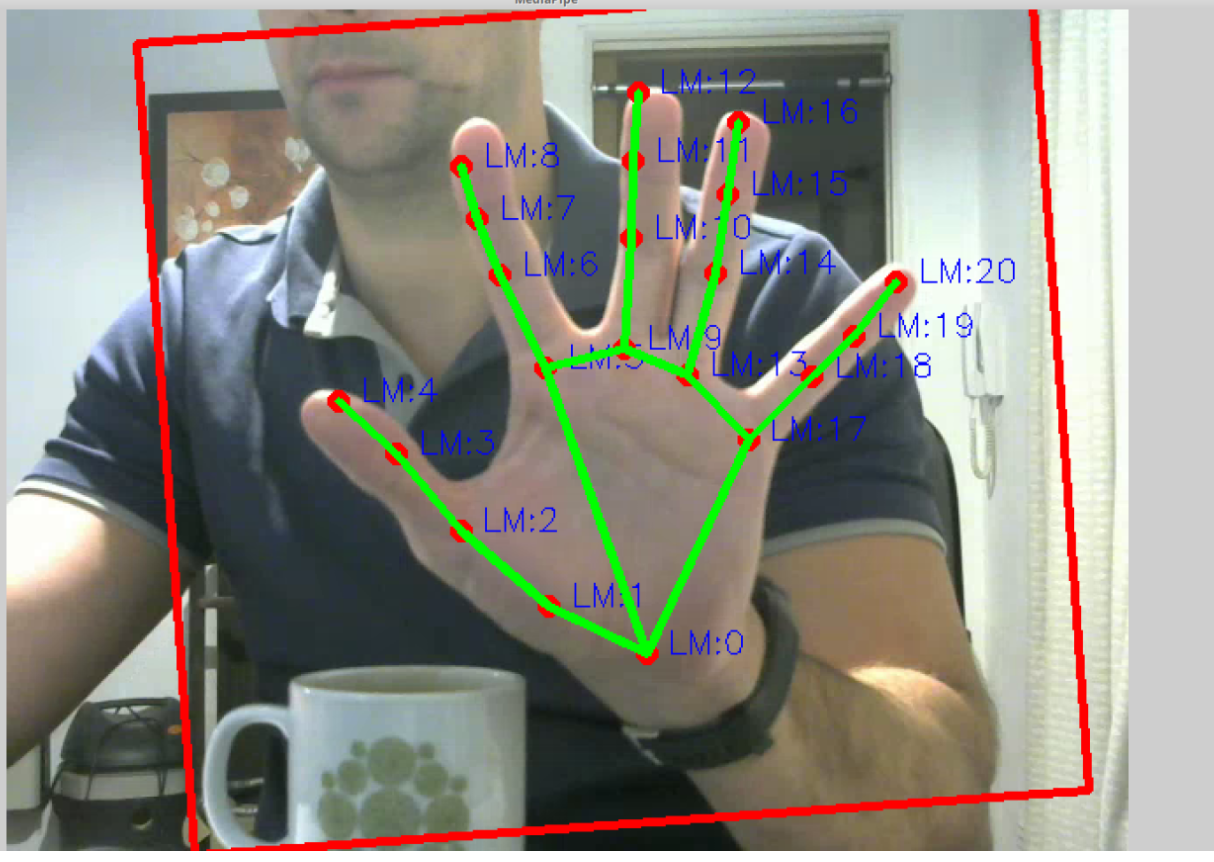
Resulting in an easier to understand visualization:


Next we need a way to estimate angles between correlated landmarks.


I was trying to develop this project with an incremental approach, at first easy modifications to MediaPipe’s examples but at the same time each component should be very reusable down the line. 

In this stage I created a new project, and associated graph, called “staticGesturesCaptureToFile”, you can check the files in the folders with that name.

 This new project is a simple  modification to the original Hand Detection Subgraph: https://mediapipe.readthedocs.io/en/latest/hand_detection_mobile_gpu.html#hand-detection-subgraph

I added two calculators to this subgraph:


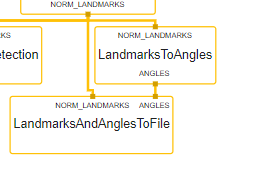
The first one is the “LandmarksToAnglesCalculator” which calculates three kinds of angles:

– One is the Pip/Dip angle, the angle of each joint with respect to the previous and the next joints, like if they were in 2d space. Stored in the “angle1” value of the protobuf  

– Second is the MCP angle, which calculates the angles between each finger, useful to check if the fingers are “closed” (imagine a Stop gesture) or “open” (imagine doing a number 5 gesture). Stored in “angle2”

– Third is the LandMark 0, which indicates the rotation of the whole hand with respect to the vertical axis, stored in “angle2”

 The code is simple and PLEASE, excuse me for using this horrible literals in the middle of the code, I’m trying to go as fast and posible and this means cutting a lot of corners:

    //Pip Dip angles

    if (((new_angle.landmarkid() > 1) && (new_angle.landmarkid() < 4)) ||

        ((new_angle.landmarkid() > 5) && (new_angle.landmarkid() < 8)) ||

        ((new_angle.landmarkid() > 9) && (new_angle.landmarkid() < 12)) ||

        ((new_angle.landmarkid() > 13) && (new_angle.landmarkid() < 16)) ||

        ((new_angle.landmarkid() > 17) && (new_angle.landmarkid() < 20)))

    {


      new_angle.set_angle1(angleBetweenLines(landmark.x(), landmark.y(),

                                             landmarks[new_angle.landmarkid() + 1].x(), landmarks[new_angle.landmarkid() + 1].y(),

                                             landmarks[new_angle.landmarkid() - 1].x(), landmarks[new_angle.landmarkid() - 1].y(),

                                             rigthHand)); //float x0, float y0, float x1, float y1, float x2, float y2

    }


    //MCP angles

    //Angles between fingers

    if ((new_angle.landmarkid() == 1) ||

        (new_angle.landmarkid() == 5) ||

        (new_angle.landmarkid() == 9) ||

        (new_angle.landmarkid() == 13)){

      new_angle.set_angle2(angleBetweenLines(landmark.x(), landmark.y(),

                                               landmarks[new_angle.landmarkid() + 7].x(), landmarks[new_angle.landmarkid() + 7].y(),

                                               landmarks[new_angle.landmarkid() + 3].x(), landmarks[new_angle.landmarkid() + 3].y(),

                                               rigthHand));

    }


    // Palm angle

  if(new_angle.landmarkid()== 0) 

    new_angle.set_angle1( /*atan2(-(landmarks[0].y()-landmarks[9].y()), landmarks[0].x()-landmarks[9].x()));*/

        angleBetweenLines(landmarks[0].x(),landmarks[0].y(),

                                           landmarks[9].x(),landmarks[9].y(),

                                           0,landmarks[0].y(),

                                           0));

The Angle algorithm:

float LandmarksToAnglesCalculator::angleBetweenLines(float x0, float y0, float x1, float y1, float x2, float y2, bool rigth_hand) {

  float angle1 = atan2((y0-y1), x0-x1);

  float angle2 = atan2((y0-y2), x0-x2);

  float result; 


  if(rigth_hand) result = (angle2-angle1);

  else result = (angle1-angle2);

  /*result *= 180 / 3.1415; //To degrees

  if (result<0) {

      result+=360;

  }*/

  return NormalizeRadians(result);

} 

MediaPipe relies on the excellent Google’s protocol buffers for inter node messaging and the “LandmarksToAnglesCalculator” output is an “angles.proto” protobuf:

// Angles of the landmarks

// angle1: contains the angle for the particular joint (mcp pip dip)

//         except for LM0 which contains the inclination of the whole hand 

// angle2: is used to determine the angle of finger intersections, starting from the thumb

//         in example, the angle for LM:2, the base of the thumb is calculated using LM2 as the vertex and 

//         LM4 (tip of thumb) and LM8 (tip of index)

message Angle{

  optional int32 landmarkID = 1;

  optional float angle1 = 2;

  optional float angle2 = 3;

} 

(its basically an array of LandMarks)

The second Calculator is the  “LandmarksAndAnglesToFileCalculator“, this has two main functions:

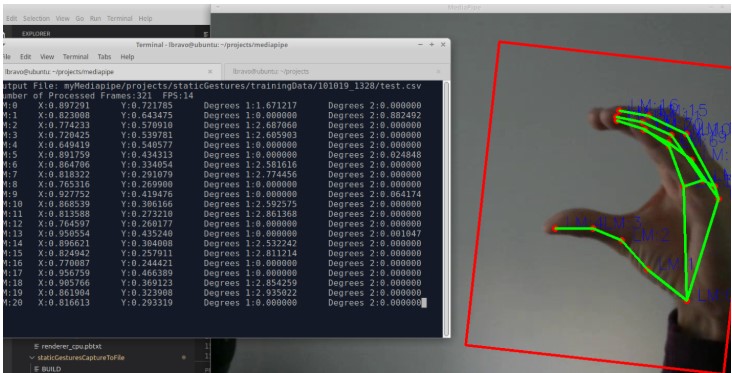
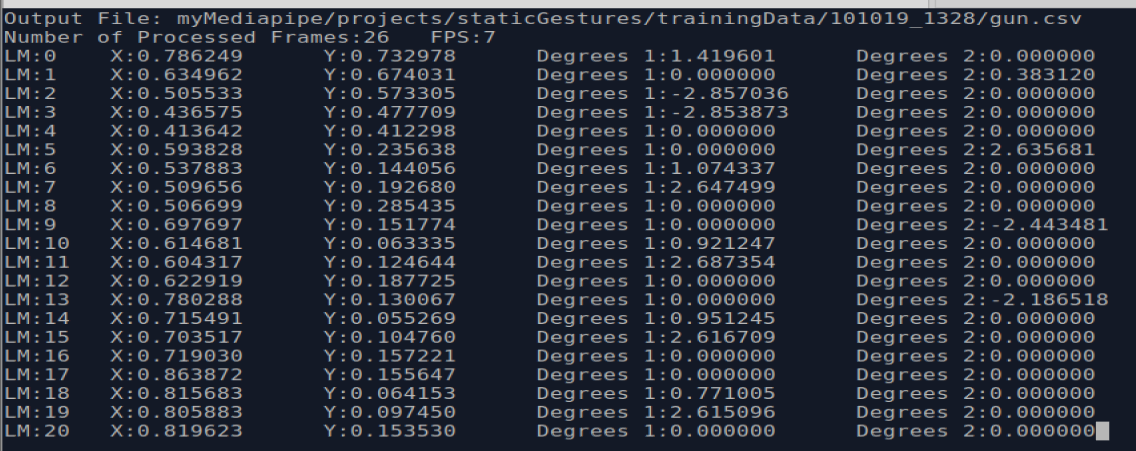
The first one is very simple, to display a human readable table based on Ncurses to assist in visualization and debugging:


The second function is the important one, it will write each received angle protobuf to a CSV file, specified in the Graph as a calculator option:

node {

  calculator: "LandmarksAndAnglesToFileCalculator"

  input_stream: "NORM_LANDMARKS:hand_landmarks"

  input_stream: "ANGLES:angles"

  node_options: {

    [type.googleapis.com/mediapipe.LandmarksAndAnglesToFileCalculatorOptions] {

      file_name: "myMediapipe/projects/staticGestures/trainingData/101019_1328/gun.csv" 

      debug_to_terminal: true

      minFPS: 7

    }

  }

}


The explanation for this is, because we are estimating 3d angles from 2d images, and from there we want to estimate gestures, a big challenge is that the calculated angles will be very different, for the same gesture, if the hand is rotated left or right. The same if it is the left or right hand, we’ll end up with a seemingly incongruent set of angles which will make imposible to calculate the shown gesture. This two pictures presents the intuition behind previous explanation:

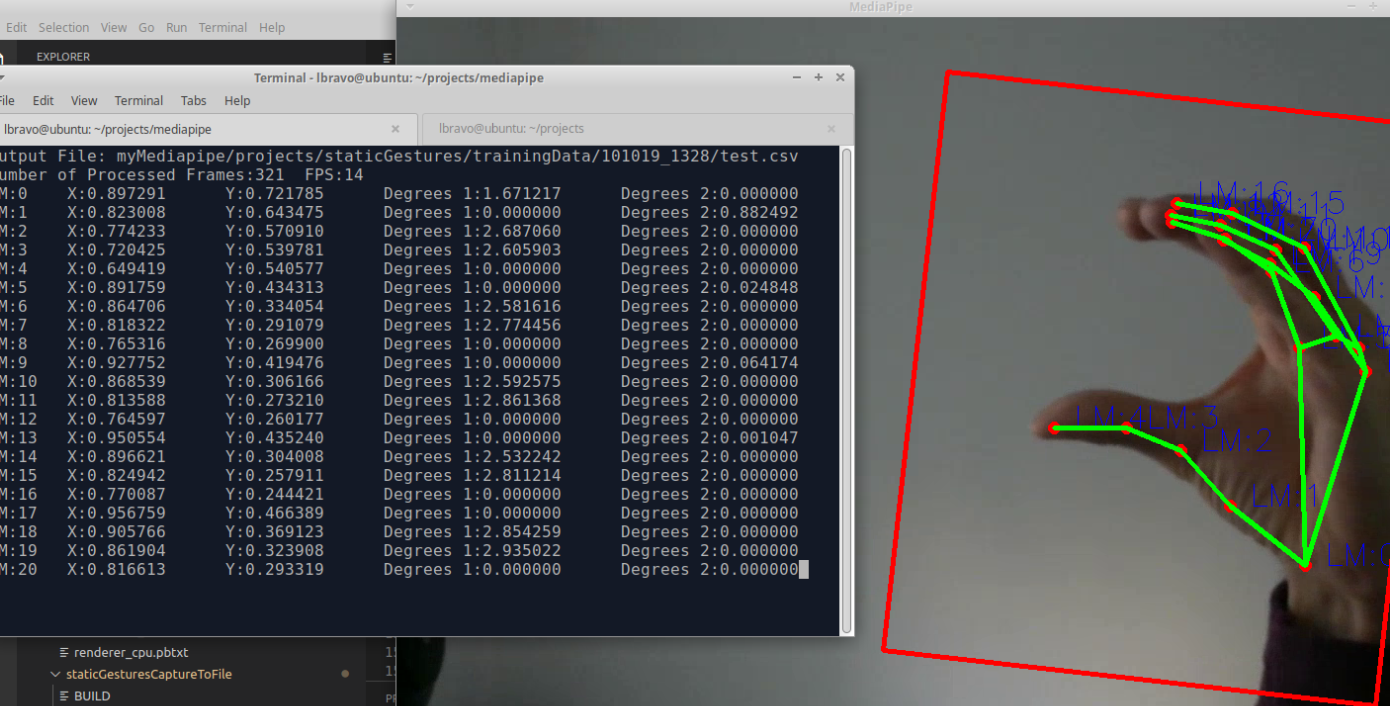
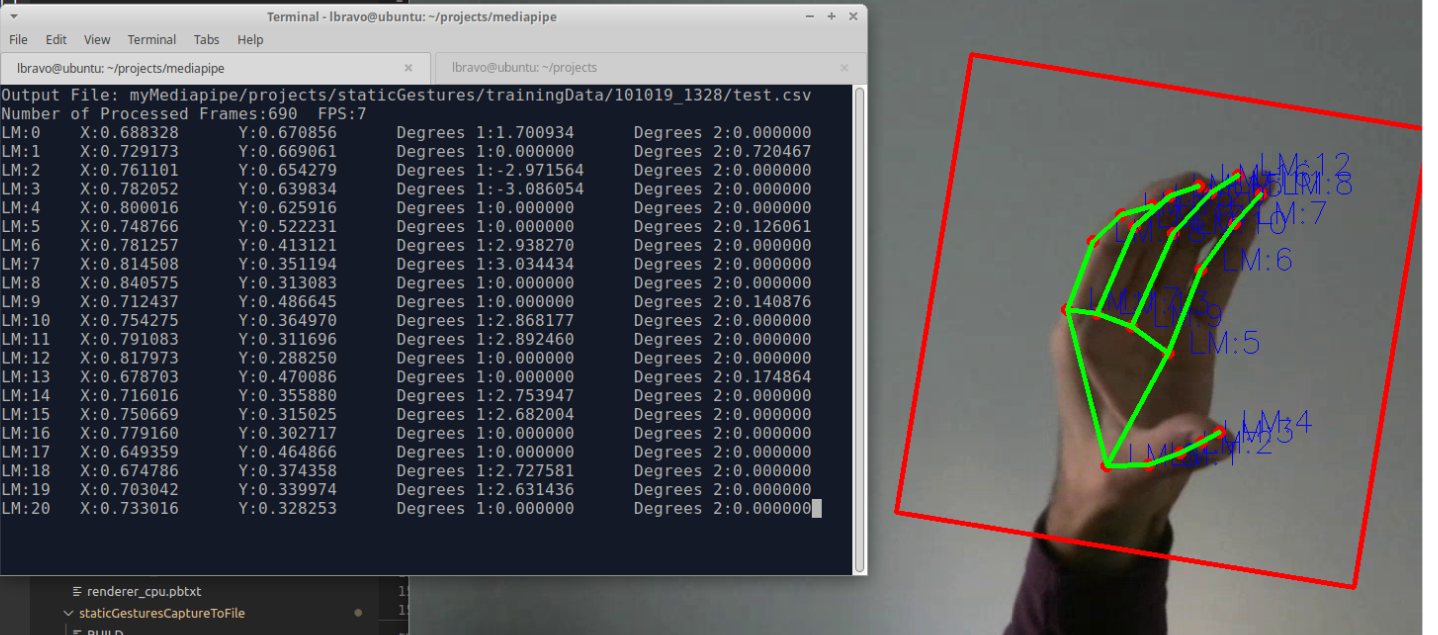
 And this is a cornerstone of this project, gestures should be inferred no matter which position, orientation or which hand the camera is looking at, a very daunting challenge. 

 To solve this I came up with the following schema: 

– Establish an initial set of supported gestures, initially 8, just as a starting point, they are:

– For each static gesture, I used the “staticGesturesCaptureToFile” project  to capture at least 1600 frames of the same gesture, during this process both hands should be used, one at a time, and the hand position should be rotated as much as possible, both vertically (side to side) and horizontally (tilting). For each gesture, you need to modify the calculator option to write to a new csv, i.e. myMediapipe/projects/staticGestures/trainingData/101019_1328/gun.csv”. 

The Idea is to generate as as much data as possible for each set of angles so every possible variation is recorded (check that folder for a better idea on how the data was distributed, labeled, etc)

 – After having generated enough data, it’s time to use some “magic”… and by that I mean to take advantage on one of the most powerful aspects of Neural Networks, to automatically find correlations between a seemingly hectic set of data, from there we can start inferring gestures

 About the Neural Network model, it turns out to be so simple, that I believe that it should be replaced with a simpler machine learning model, like a decision tree, to speed things up. But for now, an NN allowed me to continue with the project as fast as possible.

 I won’t stop here to explain in detail the process of building and training this NN, but I’ll give a general overlook:

 – It was built on Google Colab, they provide a free jupyter notebook environment with access to both GPU and NPU for training NN (thanks Google, Big Time). GPU is more than enough for this project.

– Basically the process consist of :

  • Upload the csv dataset to Google drive 

  • Inside Colab, mount the previous Drive folder

  • Load the data

  • Cleaning (this one should be improved, to remove spurious misdetections)

  • Balancing, which ensures that the NN is trained on an even number of examples for each category

  • Reformat the data to conform to what the Neural Network expect

  • Set some data apart for testing

  • Make the model

  • Train it

  • Some nice plots & Evaluation (94.13 accuracy, lot of margin for improvement here with enough time )

  • Saving the model in TensorFlow format and then in TF lite format (this project uses TFLite models)

 – The model was built and trained on Keras, of course in python and as detailed as possible, check it at: https://colab.research.google.com/drive/1pdS8SRoXBACkIFhWMz7QwA_Wt1HkGRMQ

… will continue in the 3rd part of the series