7 To Pie, part 2

This project was conceptualized to be run on a Raspberry Pi while the heaviest neural networks, palm and landmark offloaded to a Coral usb accelerator. Unfortunately, MediaPipe’s team could not yet provide a quantized version of the Landmarks NN because Coral doesn’t yet support deconvolution, as stated in this issue: https://github.com/google/mediapipe/issues/426#issuecomment-581536031

So, at this moment I don’t expect great performance running HandCommander on the RPi cpu but still worth trying. 

In order to get the full potential out of the new RPi 4 (I’m working on a 4gb version) we need to switch to a 64bit OS. Coincidentally, even though MediaPipe doesn’t support RPi but the Coral dev board, their instructions for cross compiling and the provided scripts are meant for arm64 so this also justifies changing the Kernel/OS.

The first step is to backup Node-RED flows, those are:

– The “Mqtt Sony TV”

[{"id":"15918c8d.3a42a3","type":"tab","label":"Mqtt Sony TV","disabled":false,"info":""},{"id":"42c28eac.d602c","type":"exec","z":"15918c8d.3a42a3","command":"irsend -#3 SEND_ONCE sony_46 ","addpay":true,"append":"","useSpawn":"false","timer":"","oldrc":false,"name":"","x":440,"y":120,"wires":[[],[],["9b30fe6.df454"]]},{"id":"79678e76.ba6ed","type":"inject","z":"15918c8d.3a42a3","name":"","topic":"","payload":" KEY_VOLUMEUP","payloadType":"str","repeat":"","crontab":"","once":false,"onceDelay":0.1,"x":150,"y":280,"wires":[["3f687891.a79368"]]},{"id":"9b30fe6.df454","type":"debug","z":"15918c8d.3a42a3","name":"","active":true,"tosidebar":true,"console":false,"tostatus":false,"complete":"payload","targetType":"msg","x":670,"y":40,"wires":[]},{"id":"7fa1d0ed.91cb8","type":"mqtt in","z":"15918c8d.3a42a3","name":"","topic":"handCommander/tv/ir_command","qos":"2","datatype":"auto","broker":"5e1c71ef.270ab","x":150,"y":40,"wires":[["61ef8f2e.cf623"]]},{"id":"3f687891.a79368","type":"mqtt out","z":"15918c8d.3a42a3","name":"","topic":"handCommander/tv/ir_command","qos":"","retain":"","broker":"5e1c71ef.270ab","x":500,"y":320,"wires":[]},{"id":"e2483257.3f315","type":"inject","z":"15918c8d.3a42a3","name":"","topic":"","payload":" KEY_VOLUMEDOWN","payloadType":"str","repeat":"","crontab":"","once":false,"onceDelay":0.1,"x":160,"y":320,"wires":[["3f687891.a79368"]]},{"id":"7d610a3e.1596a4","type":"inject","z":"15918c8d.3a42a3","name":"","topic":"","payload":" KEY_MUTE","payloadType":"str","repeat":"","crontab":"","once":false,"onceDelay":0.1,"x":130,"y":360,"wires":[["3f687891.a79368"]]},{"id":"ec12f179.6fa82","type":"inject","z":"15918c8d.3a42a3","name":"","topic":"","payload":" KEY_POWER","payloadType":"str","repeat":"","crontab":"","once":false,"onceDelay":0.1,"x":130,"y":400,"wires":[["3f687891.a79368"]]},{"id":"61ef8f2e.cf623","type":"delay","z":"15918c8d.3a42a3","name":"","pauseType":"rate","timeout":"5","timeoutUnits":"seconds","rate":"1","nbRateUnits":"0.25","rateUnits":"second","randomFirst":"1","randomLast":"5","randomUnits":"seconds","drop":false,"x":235,"y":120,"wires":[["42c28eac.d602c"]],"l":false},{"id":"e922d019.f5b41","type":"comment","z":"15918c8d.3a42a3","name":"Testing","info":"","x":365,"y":254,"wires":[]},{"id":"8bc8054f.142af8","type":"comment","z":"15918c8d.3a42a3","name":"Mqtt to Signal","info":"","x":410,"y":40,"wires":[]},{"id":"5e1c71ef.270ab","type":"mqtt-broker","z":"","name":"Mosquitto on localhost","broker":"localhost","port":"1883","clientid":"","usetls":false,"compatmode":false,"keepalive":"60","cleansession":true,"birthTopic":"","birthQos":"0","birthPayload":"","closeTopic":"","closeQos":"0","closePayload":"","willTopic":"","willQos":"0","willPayload":""}]   

“Mqtt VLC”

[{"id":"529907f6.3d4e68","type":"tab","label":"Mqtt VLC","disabled":false,"info":""},{"id":"4fd8896e.b3ac58","type":"inject","z":"529907f6.3d4e68","name":"","topic":"","payload":"play","payloadType":"str","repeat":"","crontab":"","once":false,"onceDelay":0.1,"x":150,"y":260,"wires":[[]]},{"id":"16addc6c.a3aea4","type":"exec","z":"529907f6.3d4e68","command":"/home/pi/telnetCommands.sh 192.168.1.58 8212 733 ","addpay":true,"append":"","useSpawn":"false","timer":"","oldrc":false,"name":"","x":420,"y":140,"wires":[[],[],["dcf2d74e.11c6a8"]]},{"id":"dcf2d74e.11c6a8","type":"debug","z":"529907f6.3d4e68","name":"","active":true,"tosidebar":true,"console":false,"tostatus":false,"complete":"false","x":670,"y":60,"wires":[]},{"id":"63b4a660.89bfb8","type":"inject","z":"529907f6.3d4e68","name":"","topic":"","payload":"play","payloadType":"str","repeat":"","crontab":"","once":false,"onceDelay":0.1,"x":150,"y":260,"wires":[["75bc670.c3a1998"]]},{"id":"8f576b9c.97f0d8","type":"inject","z":"529907f6.3d4e68","name":"","topic":"","payload":"stop","payloadType":"str","repeat":"","crontab":"","once":false,"onceDelay":0.1,"x":150,"y":300,"wires":[["75bc670.c3a1998"]]},{"id":"5eb6cff2.a53e6","type":"inject","z":"529907f6.3d4e68","name":"","topic":"","payload":"prev","payloadType":"str","repeat":"","crontab":"","once":false,"onceDelay":0.1,"x":150,"y":340,"wires":[["75bc670.c3a1998"]]},{"id":"bd003741.827538","type":"inject","z":"529907f6.3d4e68","name":"","topic":"","payload":"next","payloadType":"str","repeat":"","crontab":"","once":false,"onceDelay":0.1,"x":150,"y":380,"wires":[["75bc670.c3a1998"]]},{"id":"8810e7e3.631a98","type":"mqtt in","z":"529907f6.3d4e68","name":"","topic":"handCommander/VLC","qos":"2","datatype":"auto","broker":"5e1c71ef.270ab","x":120,"y":60,"wires":[["16addc6c.a3aea4"]]},{"id":"75bc670.c3a1998","type":"mqtt out","z":"529907f6.3d4e68","name":"","topic":"handCommander/VLC","qos":"","retain":"","broker":"5e1c71ef.270ab","x":380,"y":320,"wires":[]},{"id":"ad32ef13.900b4","type":"comment","z":"529907f6.3d4e68","name":"Mqtt to Signal","info":"","x":410,"y":60,"wires":[]},{"id":"d95665cb.884bb8","type":"comment","z":"529907f6.3d4e68","name":"Testing","info":"","x":350,"y":260,"wires":[]},{"id":"5e1c71ef.270ab","type":"mqtt-broker","z":"","name":"Mosquitto on localhost","broker":"localhost","port":"1883","clientid":"","usetls":false,"compatmode":false,"keepalive":"60","cleansession":true,"birthTopic":"","birthQos":"0","birthPayload":"","closeTopic":"","closeQos":"0","closePayload":"","willTopic":"","willQos":"0","willPayload":""}] 

Remember to import those settings in the new NodeRed installation

Next is to backup your LIRC configuration as well as any other software you may have installed.

The safest way is to save an image of the entire SD card in your computer, the Read function of win32DiskImager will do just fine.

Raspbian doesn’t yet have an official 64 bit os, there are some good alternatives like Gentoo but in this case I went for Ubuntu https://ubuntu.com/download/raspberry-pi

You can download and flash an image from that site or use the new Raspberry Pi Imager https://www.raspberrypi.org/blog/raspberry-pi-imager-imaging-utility/

After the initial boot, just instal the prerequisites as described in the first post in this series https://www.deuxexsilicon.com/2020/03/16/1st-motivation-and-first-steps/

Once everything is setup, its time to cross compile HandCommander, beware that it takes several steps. This instructions are based on MediaPipe’s steps to cross compile for Coral Dev Board https://github.com/google/mediapipe/blob/master/mediapipe/examples/coral/README.md, since they have a similar architecture, only minor modifications are required:

Download my latest fork of MediaPipe as well as HandCommander 

on Host

$ cd ~
$ git clone -b lisbravo_01  https://github.com/lisbravo/mediapipe.git
$ cd mediapipe
$ git clone https://github.com/lisbravo/myMediapipe.git
$ mkdir bazel-bin
$ sh mediapipe/examples/coral/setup.sh 

On Pi

$ cd ~
$ git clone -b lisbravo_01  https://github.com/lisbravo/mediapipe.git
$ cd mediapipe
$ git clone https://github.com/lisbravo/myMediapipe.git
$ mkdir bazel-bin 

Back on host

$ docker build -t coral .
$ docker run -it --name coral coral:latest 

Inside docker

 Update library paths in /mediapipe/third_party/opencv_linux.BUILD

(replace ‘x86_64-linux-gnu’ with ‘aarch64-linux-gnu’)

 “lib/aarch64-linux-gnu/libopencv_core.so”,

  “lib/aarch64-linux-gnu/libopencv_calib3d.so”,

  “lib/aarch64-linux-gnu/libopencv_features2d.so”,

  “lib/aarch64-linux-gnu/libopencv_highgui.so”,

  “lib/aarch64-linux-gnu/libopencv_imgcodecs.so”,

  “lib/aarch64-linux-gnu/libopencv_imgproc.so”,

  “lib/aarch64-linux-gnu/libopencv_video.so”,

  “lib/aarch64-linux-gnu/libopencv_videoio.so”,

  $ sed -i 's/x86_64-linux-gnu/aarch64-linux-gnu/g'  /mediapipe/third_party/opencv_linux.BUILD 

– Comment the EdgeTpu section of WORKSPACE

Line 357:

# EdgeTPU

#new_local_repository(

#    name = “edgetpu”,

#    path = “/edgetpu/libedgetpu”,

#    build_file = “/edgetpu/libedgetpu/BUILD”

#)

#new_local_repository(

#    name = “libedgetpu”,

#    path = “/usr/lib/aarch64-linux-gnu”,

#    build_file = “/edgetpu/libedgetpu/BUILD”

#)

Or just use sed:

$ sed -i '357,367{s/^/#/}' WORKSPACE
$ sed -i 's/x86_64-linux-gnu/aarch64-linux-gnu/g' WORKSPACE
$ sed -i 's/\/usr\/include/\/usr\/aarch64-linux-gnu\/include/g' WORKSPACE  

Attempt to build hello world (to download external deps)

$  bazel build -c opt --define MEDIAPIPE_DISABLE_GPU=1 mediapipe/examples/desktop/hello_world:hello_world 

Edit ./bazel-mediapipe/external/com_github_glog_glog/src/signalhandler.cc

$ sed -i 's/(void\*)context->PC_FROM_UCONTEXT/NULL/g' ./bazel-mediapipe/external/com_github_glog_glog/src/signalhandler.cc 

Try to cross compile the hello world

$ bazel clean
$ bazel build -c opt --crosstool_top=@crosstool//:toolchains --compiler=gcc --cpu=aarch64 --define MEDIAPIPE_DISABLE_GPU=1 mediapipe/examples/desktop/hello_world:hello_world 

Set the correct mqtt broker ip  (your RPi ip) in the “broker_ip” setting at line 216

$ vi myMediapipe/graphs/dynamicGestures/dynamic_gestures_cpu.pbtxt 

Cross compile HandCommander:

Option 1: Compile it for using a rtp streaming video source

$ bazel build -c opt --crosstool_top=@crosstool//:toolchains --compiler=gcc --cpu=aarch64 --define MEDIAPIPE_DISABLE_GPU=1 myMediapipe/projects/dynamicGestures:dynamic_gestures_cpu_tflite 

Option 2: Compile it to use a local Webcam

$ bazel build -c opt --crosstool_top=@crosstool//:toolchains --compiler=gcc --cpu=aarch64 --define MEDIAPIPE_DISABLE_GPU=1 myMediapipe/projects/dynamicGestures:dynamic_gestures_cpu_tflite_cam 

Copy HandCommander to Raspberry

 $ scp -r bazel-bin/myMediapipe/projects/dynamicGestures/ ubuntu@<replace with yours RPi IP>:/home/ubuntu/mediapipe/bazel-bin 

On Pi, run HandCommander

(with monitor or through VNC, RDP works but way too slow)

$ cd mediapipe 

Option 1: Using a rtp streaming video source

$ bazel-bin/dynamicGestures/dynamic_gestures_cpu_tflite \
--calculator_graph_config_file=myMediapipe/graphs/dynamicGestures/mainGraph_desktop.pbtxt --input_side_packets=input_video_path=rtp://0.0.0.0:5000 

Option 2: Using a Webcam

$ bazel-bin/dynamicGestures/dynamic_gestures_cpu_tflite_cam \
--calculator_graph_config_file=myMediapipe/graphs/dynamicGestures/mainGraph_desktop_cam.pbtxt 


If everything is in order you should see an OpenCV window with HandCommander recognizing your gestures as well as the debug messages in the terminal:


It’s interesting to check how much resources HandCommander uses, here a baseline, only XFCE is running:


With HandCommander running:


It consumes around 30-40% of the total RPi cpu, shared across all cores, and 50MB of RAM, not bad considering its making inference on 3 neural nets, 2 of them highly complex.


Also, even though I don’t currently have a fancy heatsink installed, just the cheap aluminum little squares, the max temp stays below 63 celsius:


Well, if you reached this far a sound “Congratulations!” is in order 😀

6th, Installation & Running

Installing and running MediaPipe and HandCommander on development machine

Follow this instructions to install my fork of MediaPipe and HandCommander:

$ git clone -b lisbravo_01  https://github.com/lisbravo/mediapipe.git

$ cd mediapipe

$ git clone https://github.com/lisbravo/myMediapipe.git

$ sudo apt-get update

$ sudo apt-get install libmosquittopp-dev 

If this is the first time you are installing MediaPipe, you may need additional libraries like OpenCV, please check MediaPipe’s official documentation: https://mediapipe.readthedocs.io/en/latest/install.html#installing-on-debian-and-ubuntu

Once Installed, the fastest way to test it is to run HandCommander on the dev machine and have it send commands to a Raspberry Pi. To set the basic Raspberry environment, please check my post on that matter: https://www.deuxexsilicon.com/2020/04/07/5th-to-pie-part-1/

-Note that you don’t need an actual IR emitter to test HandCommander, just a mqtt broker to publish messages, so you can even use a broker on the local machine and work without a Raspberry

You will probably need to Set the IP of the MQTT broker on HandCommander, get the IP on the Raspberry Pi with the ifconfig command, then, on the PC, modify the file myMediapipe/graphs/dynamicGestures/dynamic_gestures_cpu.pbtxt, look for the broker IP, it will probably be at/near the end:

node {
  calculator: "MqttPublisherCalculator"
  input_stream: "MQTT_MESSAGE:message"
  node_options: {
   [type.googleapis.com/mediapipe.MqttPublisherCalculatorOptions] {
      client_id: "HandCommander"
      broker_ip:  "xx.xx.xx.xx"
      broker_port: 1883
      #user: user          #optional
      #password: password  #optional
    }
  }
} 

(replace xx.xx.xx.xx with your broker’s IP) 

Then compile the project:

$ ./bldDynamicGestures.sh 

This will take a while and if everything goes well, you should see something like:

INFO: Elapsed time: 412.303s, Critical Path: 271.64s
INFO: 1876 processes: 1875 linux-sandbox, 1 local.
INFO: Build completed successfully, 2006 total actions 

In my case, I’m developing on a VMware Ubuntu image running on Windows, as explained on https://www.deuxexsilicon.com/2020/03/16/1st-motivation-and-first-steps/, so, in order to test HandCommander, you need to stream the webcam from Windows to the VMware machine, just follow the instructions on that blog entry. 

 Now you can start HandCommander, the script is:

$ ./rnDynamicGestures.sh 

Don’t worry if you see a lot of decode error at first:

[h264 @ 0x7fd22c027900] non-existing PPS 0 referenced
[h264 @ 0x7fd22c027900] decode_slice_header error
[h264 @ 0x7fd22c027900] non-existing PPS 0 referenced
[h264 @ 0x7fd22c027900] decode_slice_header error 

That just means that ffmpeg has not seen a keyframe yet, which carries SPS and PPS information.

On the other hand, if you are running Linux natively, just modify the rnDynamicGestures script to use your webcam as input

 Now you should see a video window and if you make a valid gesture, it should recognize it and the terminal from where you launched the program should show some output messages like which category the actual gesture belongs to, MQTT messages and such:

Good Work! in the next chapter I’ll show how to cross compile so HandCommander can run autonomously on the Raspberry Pi


5th, To Pie, part 1

This whole project is meant to be run in a Raspberry Pi, with the heaviest Neural Network, the handLandmarks NN, accelerated by a Coral USB Accelerator

In this first part I will only discuss the basic components in the Pi, for now HandCommander and the underlying MediaPipe framework will be run in the development PC, while the generated commands will be sent to the RPi to be converted into “physical” actions.

Those components are:

  1. Raspbian BusterNothing special about this, mentioned just for reference
  2. LIRC,Now since Kernel 4.19 does not include lirc_dev, it was a real PITA to make it work, start with this post and wish you the best of luck 😀 .Seriously, it was very difficult, at the extreme to having to use an Arduino and the IRremote Library by z3t0 with a second pair of IR receiver/transmitter just to debug LIRC signals and ended using the Arduino to capture the codes of my Sony tv and making the config file by hand. 
  3. MosquittoInstalled this one and many more in docker with the excellent tutorial made by Andreas Spiess (subscribing to this guy’s channel is a must, excellent material) in this video https://www.youtube.com/watch?v=a6mjt8tWUws
  4. Node-REDEven though Node-RED is installed with the previous tutorial, since I needed direct access to LIRC, I disabled the Node-RED container and installed it on the host. Now, I know that container to host communication is perfectly doable, but again this is a big project and some corners need to be cut in order to release a fully working beta in a reasonable time frame
  5. An InfraRed Transceiver, Very simple:

The data flow is easy to understand:

HandCommander(PC)->Mosquitto(RPi)->Node-RED->LIRC->InfraRed command to TV

 Node-RED is the intermediary, “gluing” all together, it subscribes to the mqtt broker and actuates on the LIRC module to send ir commands, this is the Flow for that task


A LIRC node does exist but in my case it wasn’t reliable, so, I switch to an Exec Node that will just execute a predefined terminal command inserting the received payload at the end. Works just fine.

Also added a very simple mqtt injector to test the above


I moved to Denmark a few weeks ago (amazing country!!!). In my apartment the cable TV is, to be honest, very expensive and the content is boring at best. Since I still  needed to test the channel changing functions, a way around this limitation was to create a VLC playlist with public streaming channels


#EXTM3U

#EXTINF:0,SW:NORWAY

http://bgo1.cdn.s3m.no/fs/live/live/chunklist.m3u8

#EXTINF:0,SW:kanal10

http://cdn-kanal10.crossnet.net:1935/kanal10/mp4:mpegts.stream/chunklist_w1523238254.m3u8

#EXTINF:0,SW:kkr

http://stream.kkr.dk/live/kkr/chunklist_w832247479.m3u8

#EXTINF:0,SW: OPPNA KANALEN

http://83.140.64.214/edge/_451iw2h_/451iw2h/chunklist_w348058882.m3u8 

VLC does not yet support mqtt subscribing, but they do have a telnet server


To send telnet commands to VLC, another Flow was created in Node-RED, with a mqtt in node subscribed to the handCommander/VLC topic, again, using a Exec node to execute a telnet command appending the mqtt payload at the end


* xxxx is the VLC telnet password


And again, a test injector

 
See you in the next chapter…

4th, Dynamic Gestures

Now things start getting interesting, it’s time put all together and start recognizing meaningful gestures

After some study on usage scenarios, and trying lots of air gestures in the void like a crazy person o_O , I came to the conclusion that gestures should be divided in 4 main categories:


 Fixed Gestures

These are the simplest of them all, just a static gesture to the camera

Examples:

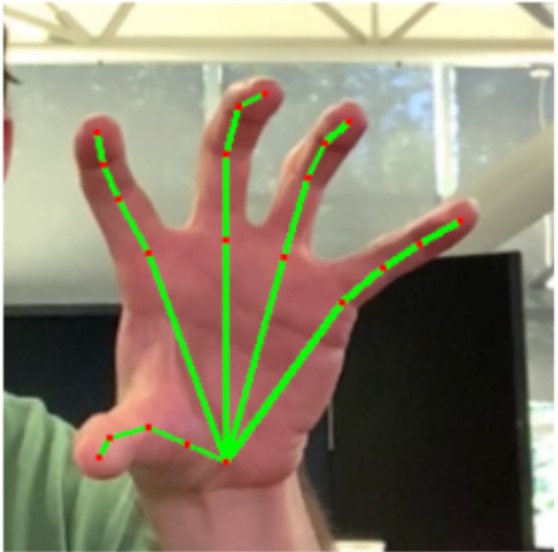
* Mute/Unmute: just show your palm closed, like a “stop” gesture

* Volume Up/Down: doing an “L” sign pointing Up/Down 

Up


Down

* Channel Up/Down: same “L sing but pointing left or right

Channel Up

Channel Down

 – Moving Gestures

These are based on a single gesture, but with movement, like linear motion or rotation

Examples:

* Channel Up/Down: Showing the index and anular fingers separated, make a Left/Right linear displacement, AKA“The Jedi gesture”

Up

Down

* Volume: this is a rotation based gesture, showing thumb, index and anular, rotate your hand like if you are holding an imaginary volume know

Up

Down


– Transition Gestures

In this case the action begins with one gesture and end with another

Example:

* Power On/Off, show your open palm and then make a fist to turn the TV Off, same backwards to turn it On, AKA “the IronMan gesture”


– Writing Gestures

This is a very complex and challenging action, still under development, but basically you hold index and annular close together and write digits in the air, those will be sent to the TV same as the button numbers in your remote control.

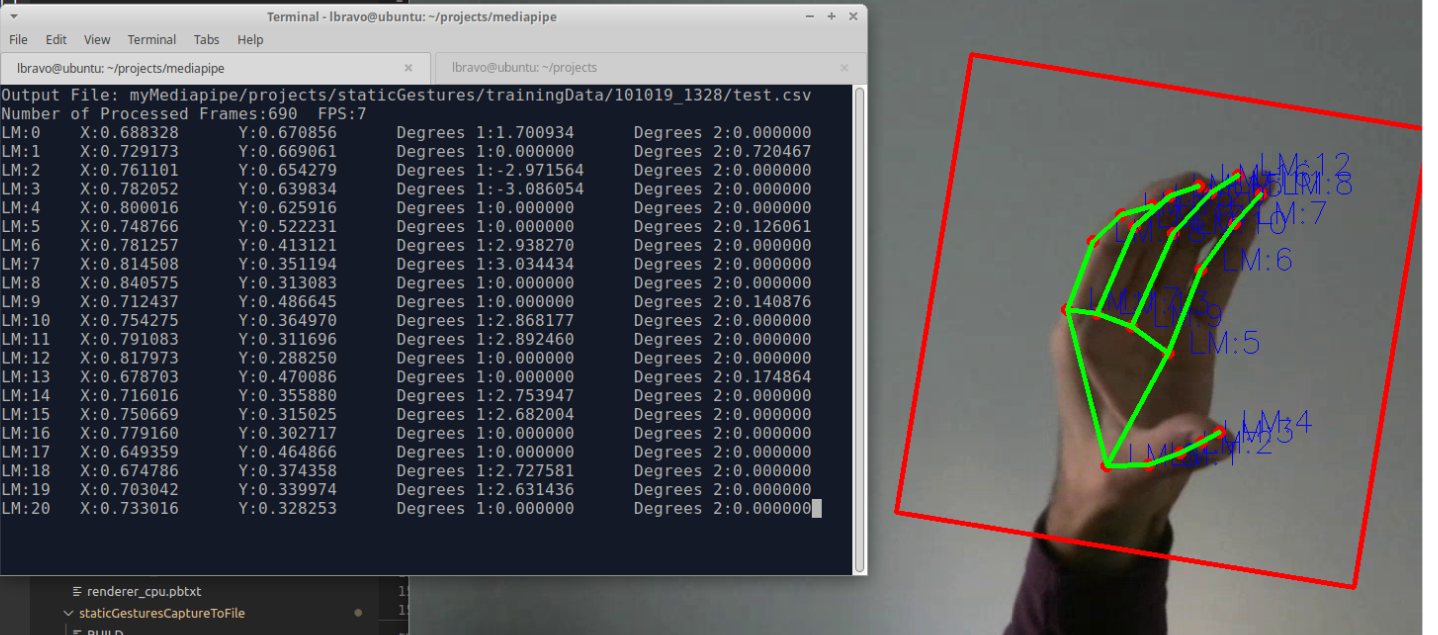
To make the previous examples possible, a new MediaPipe graph was created, with many new calculators:

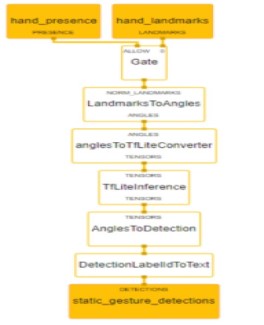
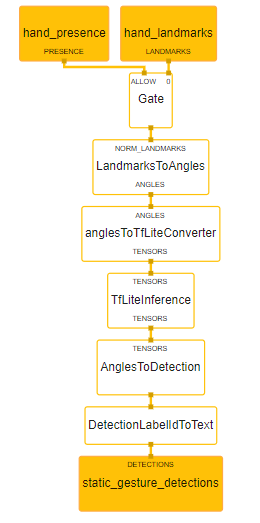
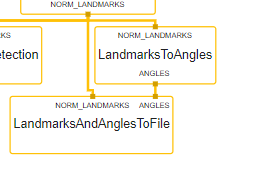
 First, a little modification to the static gestures graph:

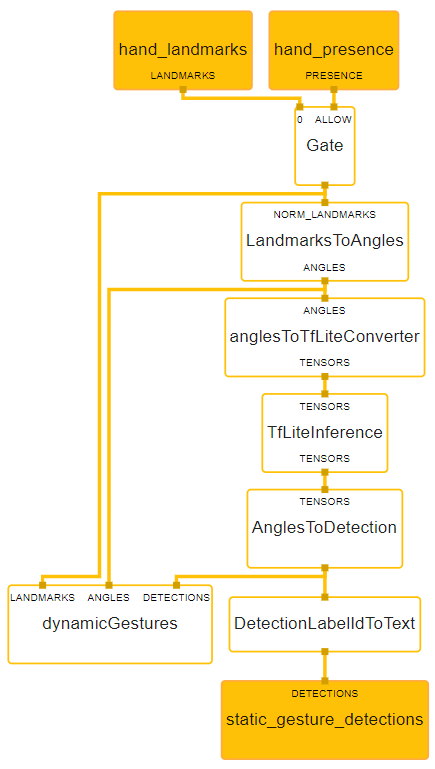
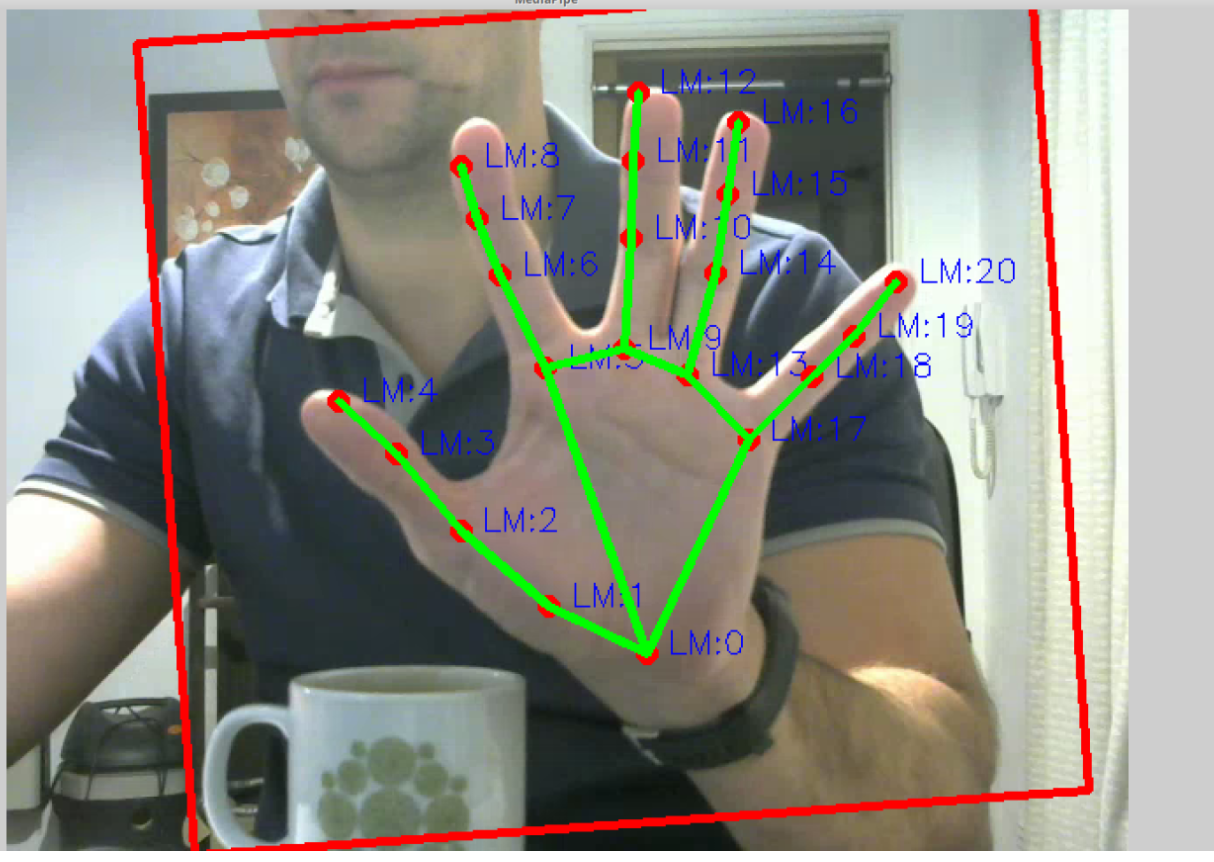
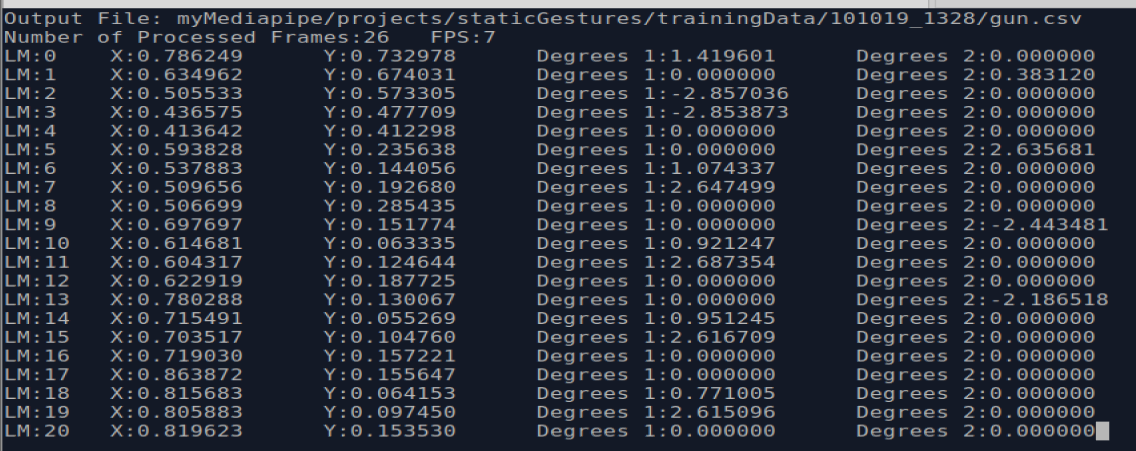
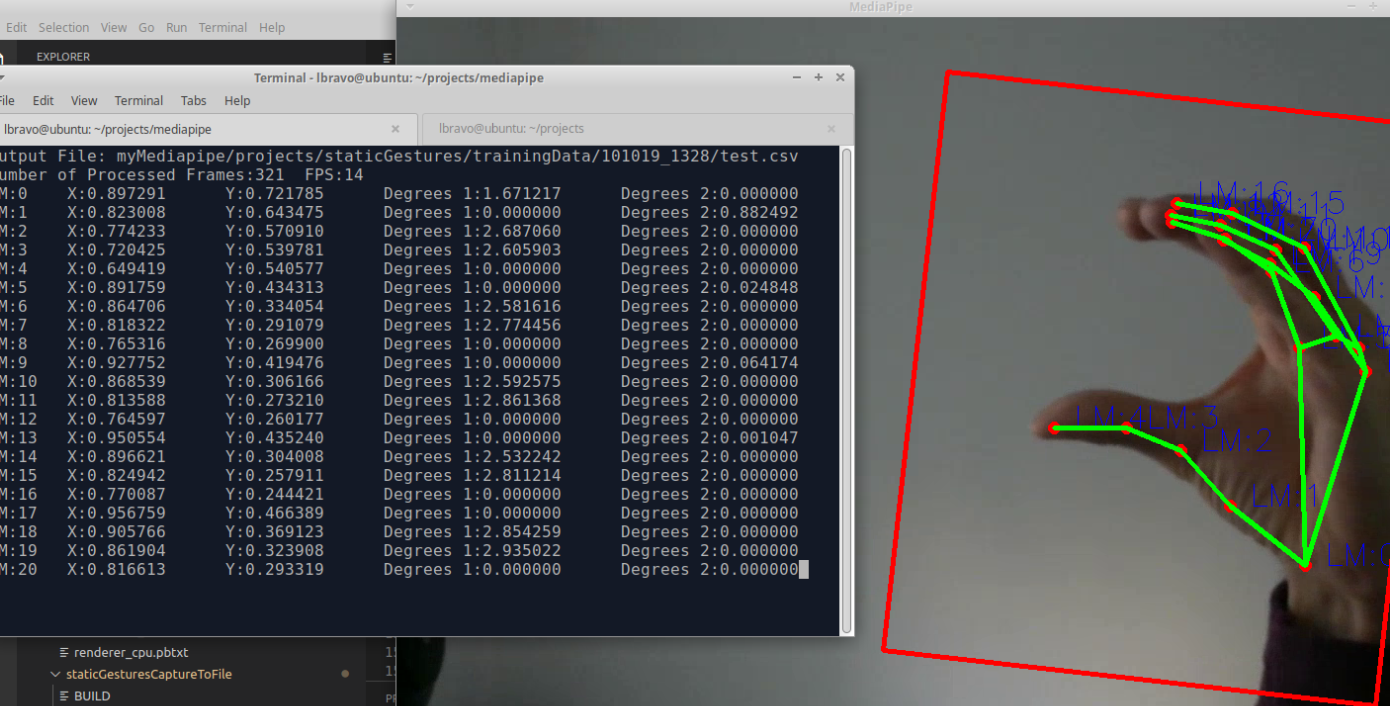
As you can see, it now includes the “dynamicGestures” subgraph, which will be in charge of the interpretation of the gestures. This new subgraph receives Landmarks, Angles (see part 2 for an in detail description) and Detections (used for gesture classification)

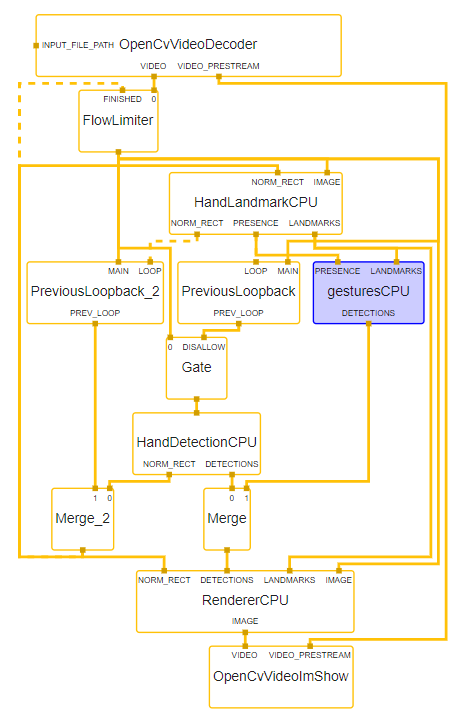
 This is the “dynamicGestures” graph:


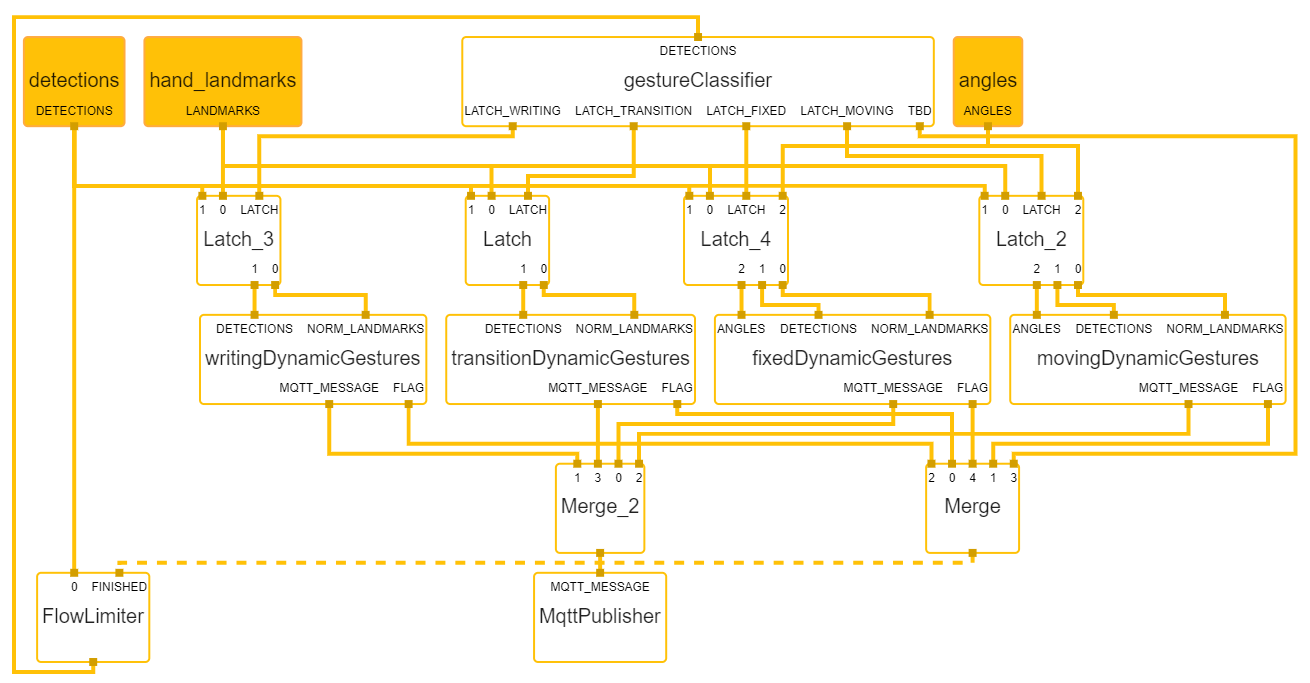
Let me explain the data flow of this graph:


  1. The FlowLimiter (bottom left corner) will only allow passage of new packets once the current packet is processed.

  2. gestureClassifierCalculator (top center) categorizes the incoming gestures and then will send a latch packet to one of the four latches below, those latches then allow passage of successive incoming gesture packets to the appropriate calculator in charge of each gesture category. The gestures categories are parameterized in a file that the calculator takes as a mandatory parameter in the graph’s configuration:

gestures_types_file_name: “myMediapipe/projects/dynamicGestures/dynamic_gestures_map.txt”


  1. Each gesture calculator has a specific set of parameters:

A- “fixedDynamicGesturesCalculator“, allows the same gesture to be used for different actions, i.e. the “L” gesture will trigger Volume Up/Down and Channel Up/Down based on the rotation of the hand, index pointing up in Vol Up, pointing left is Channel Up, etc. You can also specify a gesture with only one behaviour, in this case used for Mute. 

Common to all calculators is the mqtt_message option, subdivided in topic and payload 

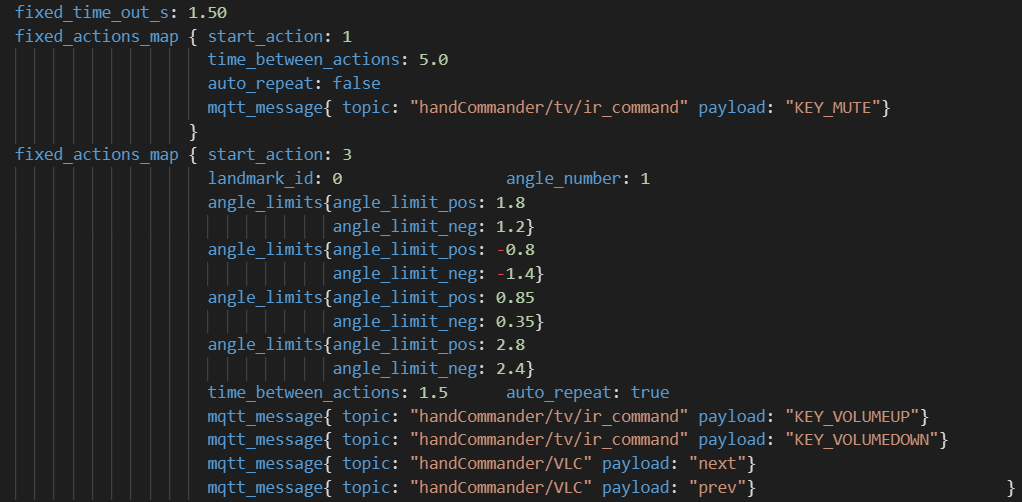
Other relevant options are:

–  fixed_time_out_s: the max time to wait for gesture completion and release the control of the incoming packets. 

– Time_between_actions: if set, indicates how often the action should auto repeat.

– Landmark_id & Angle_number: the angle from which to differentiate which action within a same gesture, in this case 0, the horizontal rotation of the hand.


B- “movingDynamicGesturesCalculator, also allows the same gesture to be used on different actions but based on displacement or rotation

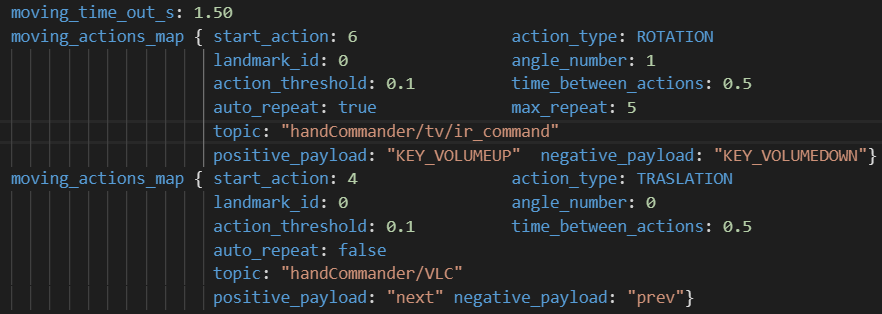
– Action_type: whether is a ROTATION or TRASLATION movement. 

– landmark_id & angle_number: the angle in case of a rotation based gesture

– time_between_actions & auto_repeat: If and how frequent the action should be repeated

– max_repeat: Maximum number of action repetition, used to prevent an excessive number of actions, ie turning the volume too loud

– action_threshold: specific to traslation movements, a threshold to trigger the action based on how much distance the hand has traveled

– In this case we also have the mqtt topic, but the payload is divided in positive_payload and negative_payload, ie in the case of the volume action, it will send the positive or neg whether the hand is rotating clockwise or counter clockwise, channels Up/Down depending on left to right movement or backwards.

C- “transitionDynamicGesturesCalculator” , these begin with one gesture and end with another

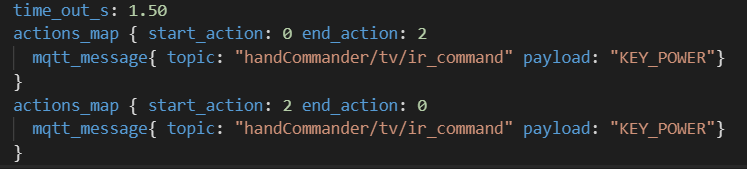
– Start_action & end_action: the initial and final gesture (should be renamed in the future)

– time_out_s, topic & payload: same as in the “fixedDynamicGesturesCalculator

D- As mentioned, “writingDynamicGesturesCalculator” is still under development and will be discussed when implemented


  1.  After the corresponding calculator has “transformed” a gesture or series of gestures into an executable action, they will generate two packets:

    1. A Mqtt packet with required topic and payload

    2. A ……_gesture_clear packet that will release the flow control of gesture packets from the current calculator back to the “gestureClassifierCalculator

  2.  Lastly, the “MqttPublisherCalculator” will publish the received action to the specified broker:

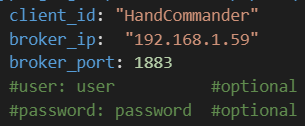
This calculator is an implementation on the super simple and easy to understand simple-mqtt-client by mec-kon.


Note: I’m not 100% convinced with this flow control mechanism, it seems unreliable and susceptible to freezes if a particular gesture calculator goes haywire. Initially I evaluated other models but ran into some issues that would have taken me too much time to solve, but now this is released as open source and eager to get some help on the matter. 

The issue with other approaches is that sending packets “upstream” in the flow generates sync errors.

I remember having read some suggestion to a similar problem in the issues section on the mediapipe’s github, where someone suggested using callbacks, but this seems a bit nasty to me since the whole idea behind calculators is that they are supposed to be indepent execution units.

A quick, temporary fix could be a “WatchDog” calculator that generates a latch release packet after a certain time, with an input monitoring the output of the gesture calculators.

If you got this far you definitely deserve a treat 😀 , this is the Github repo for myMediapipe 

…still lots to do


3rd, Static Gestures, Inference

Now I have a Neural Network that infers static gestures, in order to keep this development process as tidy as possible, I created a new project and correspondent Graph in order to test the static inference functionality. It’s located in the folder “projects/staticGestures/staticGestures/” and the graph is “gestures_cpu.pbtxt” (it’s in the /graph folder)

 here’s the sub Graph:


It’s kind of simple to explain:

  • There is a Gate calculator that will only allow the passage of landmark Packets when receiving a Flag Packet indicating that there is a hand presence, this one is generated in the  “HandDetectionSubgraph” and forwarded to this graph by the main graph, I have included both graphs below for reference, you can check the definition in the project folder
  • The Angles packets are “reformatted” in the “anglesToTfLiteConverter” calculator, from Angles to TFLite input tensors
  • Those tensors are feed to a TFLite inference calculator which outputs a tensor with predicted results
  • The inferred Angles tensor in reconverted to Detections, as expected in the next node, also this calculator has an queue_size option, when set, it will create a FIFO buffer and will return the most frequent gesture in that buffer, this is to rejects spurious misdetections from the inference engine (though the actual implementation needs some debugging). It will also set a bounding box to be displayed in the output screen
  • DetectionLabelIdToTextCalculator” (from MediaPipe’s library of calculators) replaces Label ID with human readable label names, which will be shown in the output video.

Main graph:

Hand_detection_cpu graph:


  •  

2nd, Static Gestures, Gathering Data

With the development environment up and running, next in the pipeline is to be able to detect and interpret static gestures, the basis of this framework.

The MediaPipe team have shown the framework recognizing gestures in the document:

https://ai.googleblog.com/2019/08/on-device-real-time-hand-tracking-with.html

Now unfortunately they didn’t share the code on how to do it, but there are some clues on how. Since every landwark(finger and palm joints) is detected and the tags for each joint is constant, we can use the relation between joints to estimate an angle for each phalange. I use the word “estimate” correctly because we are going to be estimating a 3d angle from a 2d Image.

First in order is to identify each landmark. To make everything more visual and easy to understand, I begun by modifying the calculator that render landmarks: 

mediapipe/calculators/util/landmarks_to_render_data_calculator.cc

In this calculator this code enables to tag each landmark in the video output:

      const unsigned char lmIndex = &landmark - &landmarks[0];

      auto* landmarks_text_render = render_data->add_render_annotations();

      auto* landmark_text =

      landmarks_text_render->mutable_text();

      std::string dispText = "LM:";

      dispText.append(std::to_string(lmIndex));

      landmark_text->set_normalized(true);

      landmark_text->set_display_text(dispText); 

      landmark_text->set_font_height(0.03);

      landmark_text->set_baseline(landmark.y());

      landmark_text->set_left(landmark.x() + 0.02);

      landmarks_text_render->mutable_color()->set_r(0);

      landmarks_text_render->mutable_color()->set_g(0);

      landmarks_text_render->mutable_color()-> set_b(255);

      landmarks_text_render->set_scene_tag(kLandmarkLabel); 

Resulting in an easier to understand visualization:


Next we need a way to estimate angles between correlated landmarks.


I was trying to develop this project with an incremental approach, at first easy modifications to MediaPipe’s examples but at the same time each component should be very reusable down the line. 

In this stage I created a new project, and associated graph, called “staticGesturesCaptureToFile”, you can check the files in the folders with that name.

 This new project is a simple  modification to the original Hand Detection Subgraph: https://mediapipe.readthedocs.io/en/latest/hand_detection_mobile_gpu.html#hand-detection-subgraph

I added two calculators to this subgraph:


The first one is the “LandmarksToAnglesCalculator” which calculates three kinds of angles:

– One is the Pip/Dip angle, the angle of each joint with respect to the previous and the next joints, like if they were in 2d space. Stored in the “angle1” value of the protobuf  

– Second is the MCP angle, which calculates the angles between each finger, useful to check if the fingers are “closed” (imagine a Stop gesture) or “open” (imagine doing a number 5 gesture). Stored in “angle2”

– Third is the LandMark 0, which indicates the rotation of the whole hand with respect to the vertical axis, stored in “angle2”

 The code is simple and PLEASE, excuse me for using this horrible literals in the middle of the code, I’m trying to go as fast and posible and this means cutting a lot of corners:

    //Pip Dip angles

    if (((new_angle.landmarkid() > 1) && (new_angle.landmarkid() < 4)) ||

        ((new_angle.landmarkid() > 5) && (new_angle.landmarkid() < 8)) ||

        ((new_angle.landmarkid() > 9) && (new_angle.landmarkid() < 12)) ||

        ((new_angle.landmarkid() > 13) && (new_angle.landmarkid() < 16)) ||

        ((new_angle.landmarkid() > 17) && (new_angle.landmarkid() < 20)))

    {


      new_angle.set_angle1(angleBetweenLines(landmark.x(), landmark.y(),

                                             landmarks[new_angle.landmarkid() + 1].x(), landmarks[new_angle.landmarkid() + 1].y(),

                                             landmarks[new_angle.landmarkid() - 1].x(), landmarks[new_angle.landmarkid() - 1].y(),

                                             rigthHand)); //float x0, float y0, float x1, float y1, float x2, float y2

    }


    //MCP angles

    //Angles between fingers

    if ((new_angle.landmarkid() == 1) ||

        (new_angle.landmarkid() == 5) ||

        (new_angle.landmarkid() == 9) ||

        (new_angle.landmarkid() == 13)){

      new_angle.set_angle2(angleBetweenLines(landmark.x(), landmark.y(),

                                               landmarks[new_angle.landmarkid() + 7].x(), landmarks[new_angle.landmarkid() + 7].y(),

                                               landmarks[new_angle.landmarkid() + 3].x(), landmarks[new_angle.landmarkid() + 3].y(),

                                               rigthHand));

    }


    // Palm angle

  if(new_angle.landmarkid()== 0) 

    new_angle.set_angle1( /*atan2(-(landmarks[0].y()-landmarks[9].y()), landmarks[0].x()-landmarks[9].x()));*/

        angleBetweenLines(landmarks[0].x(),landmarks[0].y(),

                                           landmarks[9].x(),landmarks[9].y(),

                                           0,landmarks[0].y(),

                                           0));

The Angle algorithm:

float LandmarksToAnglesCalculator::angleBetweenLines(float x0, float y0, float x1, float y1, float x2, float y2, bool rigth_hand) {

  float angle1 = atan2((y0-y1), x0-x1);

  float angle2 = atan2((y0-y2), x0-x2);

  float result; 


  if(rigth_hand) result = (angle2-angle1);

  else result = (angle1-angle2);

  /*result *= 180 / 3.1415; //To degrees

  if (result<0) {

      result+=360;

  }*/

  return NormalizeRadians(result);

} 

MediaPipe relies on the excellent Google’s protocol buffers for inter node messaging and the “LandmarksToAnglesCalculator” output is an “angles.proto” protobuf:

// Angles of the landmarks

// angle1: contains the angle for the particular joint (mcp pip dip)

//         except for LM0 which contains the inclination of the whole hand 

// angle2: is used to determine the angle of finger intersections, starting from the thumb

//         in example, the angle for LM:2, the base of the thumb is calculated using LM2 as the vertex and 

//         LM4 (tip of thumb) and LM8 (tip of index)

message Angle{

  optional int32 landmarkID = 1;

  optional float angle1 = 2;

  optional float angle2 = 3;

} 

(its basically an array of LandMarks)

The second Calculator is the  “LandmarksAndAnglesToFileCalculator“, this has two main functions:

The first one is very simple, to display a human readable table based on Ncurses to assist in visualization and debugging:


The second function is the important one, it will write each received angle protobuf to a CSV file, specified in the Graph as a calculator option:

node {

  calculator: "LandmarksAndAnglesToFileCalculator"

  input_stream: "NORM_LANDMARKS:hand_landmarks"

  input_stream: "ANGLES:angles"

  node_options: {

    [type.googleapis.com/mediapipe.LandmarksAndAnglesToFileCalculatorOptions] {

      file_name: "myMediapipe/projects/staticGestures/trainingData/101019_1328/gun.csv" 

      debug_to_terminal: true

      minFPS: 7

    }

  }

}


The explanation for this is, because we are estimating 3d angles from 2d images, and from there we want to estimate gestures, a big challenge is that the calculated angles will be very different, for the same gesture, if the hand is rotated left or right. The same if it is the left or right hand, we’ll end up with a seemingly incongruent set of angles which will make imposible to calculate the shown gesture. This two pictures presents the intuition behind previous explanation:

 And this is a cornerstone of this project, gestures should be inferred no matter which position, orientation or which hand the camera is looking at, a very daunting challenge. 

 To solve this I came up with the following schema: 

– Establish an initial set of supported gestures, initially 8, just as a starting point, they are:

– For each static gesture, I used the “staticGesturesCaptureToFile” project  to capture at least 1600 frames of the same gesture, during this process both hands should be used, one at a time, and the hand position should be rotated as much as possible, both vertically (side to side) and horizontally (tilting). For each gesture, you need to modify the calculator option to write to a new csv, i.e. myMediapipe/projects/staticGestures/trainingData/101019_1328/gun.csv”. 

The Idea is to generate as as much data as possible for each set of angles so every possible variation is recorded (check that folder for a better idea on how the data was distributed, labeled, etc)

 – After having generated enough data, it’s time to use some “magic”… and by that I mean to take advantage on one of the most powerful aspects of Neural Networks, to automatically find correlations between a seemingly hectic set of data, from there we can start inferring gestures

 About the Neural Network model, it turns out to be so simple, that I believe that it should be replaced with a simpler machine learning model, like a decision tree, to speed things up. But for now, an NN allowed me to continue with the project as fast as possible.

 I won’t stop here to explain in detail the process of building and training this NN, but I’ll give a general overlook:

 – It was built on Google Colab, they provide a free jupyter notebook environment with access to both GPU and NPU for training NN (thanks Google, Big Time). GPU is more than enough for this project.

– Basically the process consist of :

  • Upload the csv dataset to Google drive 

  • Inside Colab, mount the previous Drive folder

  • Load the data

  • Cleaning (this one should be improved, to remove spurious misdetections)

  • Balancing, which ensures that the NN is trained on an even number of examples for each category

  • Reformat the data to conform to what the Neural Network expect

  • Set some data apart for testing

  • Make the model

  • Train it

  • Some nice plots & Evaluation (94.13 accuracy, lot of margin for improvement here with enough time )

  • Saving the model in TensorFlow format and then in TF lite format (this project uses TFLite models)

 – The model was built and trained on Keras, of course in python and as detailed as possible, check it at: https://colab.research.google.com/drive/1pdS8SRoXBACkIFhWMz7QwA_Wt1HkGRMQ

… will continue in the 3rd part of the series


1st, Motivation and First Steps

It’s incredible how far an engineer will go to solve a simple problem, but maybe it’s not about the problem itself, or the solution, but just the fun of doing something new and challenging…

In this case, the motivation came from a simple, everyday situation: My cable TV provider’s cheap set-top box remote was getting worse and worse, no matter how many times I opened it to clean it, always go back to sticky buttons, keys that didn’t they respond etc. What a great opportunity to get started on deep neural networks and computer vision 🙂 , let’s make a TV control based on hand gestures!

After I started doing some research, my first disappointment was to find that there were many examples going around and they all were based on the same structure, many convolutional networks stacked together in order to recognize a human hand. This is a good approach in many scenarios, but represents some particular challenges for this project, one is that, in order to be reliable, they require a huge amount of training data, hundreds (if not thousands) of hand images, shooted at slightly different angles, in different lighting conditions, different hands, etc. The second issue is very similar, the system should recognize different hand gestures, that means again lots of training images, this is both impractical and at the same time, lacking the necessary flexibility for this to be easily expandable. I have read of a few projects that went down this route, some with a notable level of success, but I suspected at that time that there must be something better out there.

It was around a week later when I found out about this project from google called MediaPipe, as they define it:

Basically is a graph based set of modules to process serial data in a pipelined structure. But what definitely caught my attention was this entry on google’s AI blog:

https://ai.googleblog.com/2019/08/on-device-real-time-hand-tracking-with.html

In short,they are inferring a set of hand landmarks that corresponds to the wrist, palm and finger joints, from there they establish a set of “connections“ representing the relations between each joint:

But the best part of this approach is that, as you can read further in the article, this concept enables the recognition of gestures by measuring the angle of the relevant joints, and this is VERY important because it enables to infer gestures based on its Invariant Features, meaning that we now dont have to rely on a “dumb” recognizer that only matches patterns of an image like a standard convolutional network does, but a more human like level of inteligence, establishing relations between features.

There are other worth mentioning aspects of their implementation: 

  •  – C++ based, designed from the ground up to be as fast as possible.  
  • – Relatively easy to port to major platforms:, Linux, Android, IOS, Windows?
  • – Support for CPU, GPU and Coral inference 
  • – They also developed a very nice trick to drastically improve performance, instead of    scanning the whole image in search for a hand, they trained a palm NN model which requires less time to recognize a hand presence, and from there they set a bounding box (a portion of the entire frame) in which the landmarks are then inferred.

Now that the underlying technology is established, it was time to set up the development environment. My main laptop runs on Windows, the current Mediapipe environment is meant to be installed on Linux  and I was not willing to fiddle with second partitions and whatever, some form of emulation is in order.

At first I tried the new, and very exciting, WSL 2 (windows subsystem for linux), it has a lot of potential for linux app development windows  but the main issue for me at that time was not being able to use a webcam as a video source. I tried many different approaches, including a webcam emulator called  v4l2loopback, but as often is the case with linux, things can turn out to be pretty troublesome.

The second approach was to use the docker image for Mediapipe on Docker for Windows, but then again, getting video from the windows webcam to the linux system proved to be very time consuming.

Finally, the right (or at least acceptable) combination was to run a VMware Ubuntu virtual machine, and stream the webcam’s video with ffmpeg, here’s my .bat for that, I’m not using my laptop’s webcam but an indestructible Logitech C270,mainly because it’s important to be a able to put the camera very close by to the controlled device, in this case on top or at the bottom of my TV.

This is the ffmpeg command that will stream the webcam to the Ubuntu’s vmware machine:

ffmpeg -f dshow ^

-i video="Logitech HD Webcam C270" ^

-profile:v high -pix_fmt yuv420p -level:v 4.1 -preset ultrafast -tune zerolatency ^

 	-vcodec libx264 -r 15 -b:v 512k -s 1024x768 -bufsize:v 50M  ^

-f rtp_mpegts -flush_packets 0 rtp://192.168.1.60:5000 

Note that the IP in the last line corresponds to the VM ip address and port. Ffplay is the simplest way to test that video is effectively being streamed into the VM, just run the bat on windows and run the following in a console inside the VM:

ffplay rtp://0.0.0.0:5000 

To install Mediapipe on the VM, just follow the instructions on the oficial documentation:

Now that everything is in place, is time for a quick test, just getting video into a MediaPipe graph and displaying it into a window… the first issue, MediaPipe at that time didn’t provide a calculator (that’s their denomination for a node) to display video in Linux, only android and ios. This was a great opportunity to make my first calculator, it was easier than expected since I just toked the structure of an existing one and tailored so it can output video to a OpenCV’s imshow window:

// Copyright 2020 Lisandro Bravo.
//
// Licensed under the Apache License, Version 2.0 (the "License");
// you may not use this file except in compliance with the License.
// You may obtain a copy of the License at
//
//      http://www.apache.org/licenses/LICENSE-2.0
//
// Unless required by applicable law or agreed to in writing, software
// distributed under the License is distributed on an "AS IS" BASIS,
// WITHOUT WARRANTIES OR CONDITIONS OF ANY KIND, either express or implied.
// See the License for the specific language governing permissions and
// limitations under the License.

#include <memory>
#include <string>
#include <vector>

#include "absl/strings/str_split.h"
#include "mediapipe/calculators/video/opencv_video_encoder_calculator.pb.h"
#include "mediapipe/framework/calculator_framework.h"
#include "mediapipe/framework/formats/image_frame.h"
#include "mediapipe/framework/formats/image_frame_opencv.h"
#include "mediapipe/framework/formats/video_stream_header.h"
#include "mediapipe/framework/port/file_helpers.h"
#include "mediapipe/framework/port/opencv_highgui_inc.h"
#include "mediapipe/framework/port/opencv_imgproc_inc.h"
#include "mediapipe/framework/port/opencv_video_inc.h"
#include "mediapipe/framework/port/ret_check.h"
#include "mediapipe/framework/port/source_location.h"
#include "mediapipe/framework/port/status.h"
#include "mediapipe/framework/port/status_builder.h"
#include "mediapipe/framework/tool/status_util.h"

namespace mediapipe {

// Encodes the input video stream and produces a media file.
// The media file can be output to the output_file_path specified as a side
// packet. Currently, the calculator only supports one video stream (in
// mediapipe::ImageFrame).
//
// Example config to generate the output video file:
//
// node {
//   calculator: "OpenCvVideoImShowCalculator"
//   input_stream: "VIDEO:video"
//   input_stream: "VIDEO_PRESTREAM:video_header"
//   input_side_packet: "OUTPUT_FILE_PATH:output_file_path"
//   node_options {
//     [type.googleapis.com/mediapipe.OpenCvVideoImShowCalculatorOptions]: {
//        codec: "avc1"
//        video_format: "mp4"
//     }
//   }
// }
class OpenCvVideoImShowCalculator : public CalculatorBase {
 public:
  static ::mediapipe::Status GetContract(CalculatorContract* cc);
  ::mediapipe::Status Open(CalculatorContext* cc) override;
  ::mediapipe::Status Process(CalculatorContext* cc) override;
  ::mediapipe::Status Close(CalculatorContext* cc) override;

 private:
  ::mediapipe::Status SetUpVideoWriter();

  std::string output_file_path_;
  int four_cc_;

  std::unique_ptr<cv::VideoWriter> writer_;
};

::mediapipe::Status OpenCvVideoImShowCalculator::GetContract(
    CalculatorContract* cc) {
  RET_CHECK(cc->Inputs().HasTag("VIDEO"));
  cc->Inputs().Tag("VIDEO").Set<ImageFrame>();
  if (cc->Inputs().HasTag("VIDEO_PRESTREAM")) {
    cc->Inputs().Tag("VIDEO_PRESTREAM").Set<VideoHeader>();
  }
  //RET_CHECK(cc->InputSidePackets().HasTag("OUTPUT_FILE_PATH"));
  //cc->InputSidePackets().Tag("OUTPUT_FILE_PATH").Set<std::string>();
  return ::mediapipe::OkStatus();
}

::mediapipe::Status OpenCvVideoImShowCalculator::Open(CalculatorContext* cc) {
  OpenCvVideoEncoderCalculatorOptions options =
      cc->Options<OpenCvVideoEncoderCalculatorOptions>();
  RET_CHECK(options.has_codec() && options.codec().length() == 4)
      << "A 4-character codec code must be specified in "
         "OpenCvVideoEncoderCalculatorOptions";
  const char* codec_array = options.codec().c_str();
  four_cc_ = mediapipe::fourcc(codec_array[0], codec_array[1], codec_array[2],
                               codec_array[3]);
  RET_CHECK(!options.video_format().empty())
      << "Video format must be specified in "
         "OpenCvVideoEncoderCalculatorOptions";
 /* output_file_path_ =
      cc->InputSidePackets().Tag("OUTPUT_FILE_PATH").Get<std::string>();
  std::vector<std::string> splited_file_path =
      absl::StrSplit(output_file_path_, '.');
  RET_CHECK(splited_file_path.size() >= 2 &&
            splited_file_path[splited_file_path.size() - 1] ==
                options.video_format())
      << "The output file path is invalid.";*/
  // If the video header will be available, the video metadata will be fetched
  // from the video header directly. The calculator will receive the video
  // header packet at timestamp prestream.
  if (cc->Inputs().HasTag("VIDEO_PRESTREAM")) {
    return ::mediapipe::OkStatus();
  }
  return SetUpVideoWriter();
}

::mediapipe::Status OpenCvVideoImShowCalculator::Process(
    CalculatorContext* cc) {
  if (cc->InputTimestamp() == Timestamp::PreStream()) {
    //const VideoHeader& video_header =
    //    cc->Inputs().Tag("VIDEO_PRESTREAM").Get<VideoHeader>();
    return SetUpVideoWriter();
  }

  const ImageFrame& image_frame =
      cc->Inputs().Tag("VIDEO").Value().Get<ImageFrame>();
  ImageFormat::Format format = image_frame.Format();
  cv::Mat frame;
  if (format == ImageFormat::GRAY8) {
    frame = formats::MatView(&image_frame);
    if (frame.empty()) {
      return ::mediapipe::InvalidArgumentErrorBuilder(MEDIAPIPE_LOC)
             << "Receive empty frame at timestamp "
             << cc->Inputs().Tag("VIDEO").Value().Timestamp()
             << " in OpenCvVideoImShowCalculator::Process()";
    }
  } else {
    cv::Mat tmp_frame = formats::MatView(&image_frame);
    if (tmp_frame.empty()) {
      return ::mediapipe::InvalidArgumentErrorBuilder(MEDIAPIPE_LOC)
             << "Receive empty frame at timestamp "
             << cc->Inputs().Tag("VIDEO").Value().Timestamp()
             << " in OpenCvVideoImShowCalculator::Process()";
    }
    if (format == ImageFormat::SRGB) {
      cv::cvtColor(tmp_frame, frame, cv::COLOR_RGB2BGR);
    } else if (format == ImageFormat::SRGBA) {
      cv::cvtColor(tmp_frame, frame, cv::COLOR_RGBA2BGR);
    } else {
      return ::mediapipe::InvalidArgumentErrorBuilder(MEDIAPIPE_LOC)
             << "Unsupported image format: " << format;
    }
  }
  cv::imshow("MediaPipe",frame);
  cv::waitKey(25);
  
  return ::mediapipe::OkStatus();
}

::mediapipe::Status OpenCvVideoImShowCalculator::Close(CalculatorContext* cc) {
  //cv::destroyAllWindows();
  return ::mediapipe::OkStatus();
}

::mediapipe::Status OpenCvVideoImShowCalculator::SetUpVideoWriter() {

  cv::namedWindow("MediaPipe",cv::WINDOW_GUI_EXPANDED);
  return ::mediapipe::OkStatus();
}

REGISTER_CALCULATOR(OpenCvVideoImShowCalculator);
}  // namespace mediapipe
 

I won’t go into the details of a calculator structure since everything is covered in deep in the official documentation: https://mediapipe.readthedocs.io/en/latest/calculator.html

Now is time to actually test a video in/out pipeline, starting by the simplest graph ever:

# MediaPipe graph, simple input and output video 

# on CPU.

# Used in the example in

# mediapipie/examples/desktop/object_detection:object_detection_tensorflow.

# Decodes an input video file into images and a video header.

node {

  calculator: "OpenCvVideoDecoderCalculator"

  input_side_packet: "INPUT_FILE_PATH:input_video_path"

  output_stream: "VIDEO:input_video"

  output_stream: "VIDEO_PRESTREAM:input_video_header"

}

# Encodes the annotated images into a video file, adopting properties specified

# in the input video header, e.g., video framerate.

node {

  calculator: "OpenCvVideoImShowCalculator"

  input_stream: "VIDEO:input_video"

  input_stream: "VIDEO_PRESTREAM:input_video_header"

  node_options: {

    [type.googleapis.com/mediapipe.OpenCvVideoEncoderCalculatorOptions]: {

      codec: "avc1"

      video_format: "mp4"

    }

  }

} 

By the way, the MediaPipe team provides an amazing online visualization tool for graphs:

Here is the visual representation of the previous graph:

Now in order to make an executable, MediaPipe relies on Bazel, a very powerful and somehow easier to read/understand replacement for Make: https://en.wikipedia.org/wiki/Bazel_(software)

Its very easy to get started, just read the BUILD file on each relevant folder. In this case, as a brief example you can see how this compiles the main Graph Runner and the Graph dependant calculators:

package(default_visibility = ["//mediapipe/examples:__subpackages__"])

cc_binary(

    name = "simple_io_tflite",

    deps = [

        "//mediapipe/examples/desktop:simple_run_graph_main",

        "//mediapipe/graphs/simple_io:desktop_tflite_calculators",

    ],

) 

Last thing is to compile and run this simple video test, compiling is as simple as:

$ bazel build -c opt --define MEDIAPIPE_DISABLE_GPU=1 \
    mediapipe/examples/desktop/simpleIO:simple_io_tflite 

Running (notice the graph argument and the video source):

$ bazel-bin/mediapipe/examples/desktop/simpleIO/simple_io_tflite \
    --calculator_graph_config_file=mediapipe/graphs/simple_io/simple_media_to_screen_graph.pbtxt \
    --input_side_packets=input_video_path=rtp://0.0.0.0:5000 

Also, in that folder there is a readme file detailing how to compile as well as some other examples on how to get video in/out from/to different sources

Lastly, this tiny graph project is located in the MediaPipe folder, because I would like for the MediaPipe team to include a basic starting example in future releases so others can benefit from it.

That’s it for now, but first a small “disclaimer”: I know there must be a gazillion different approaches to this whole project and/or parts of it, I’m sure that many of them are much nicer and cleaner than what I did. My main goal with this first beta is to get a working and stable prototype out there with a solid underlying structure. There will be tons of time in the future to iron small details and I’m really eager to hear what you would have done differently.